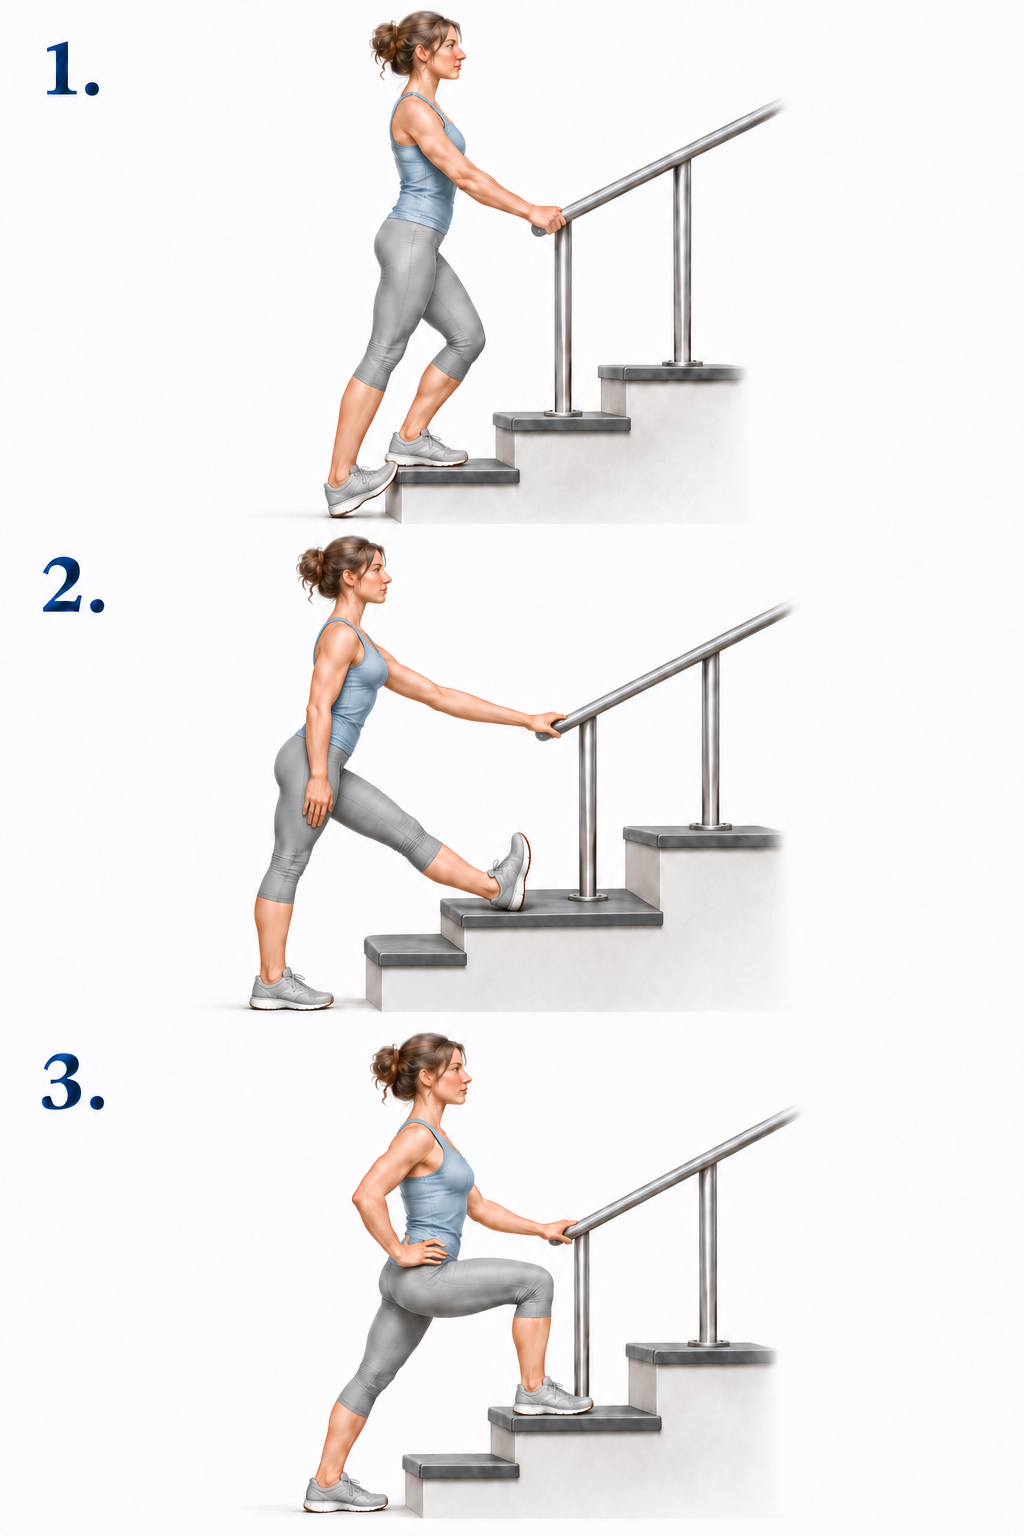
Move slowly and breathe normally. A second stretch can be slightly deeper only if it remains comfortable. Adapt the routine to your ability and individual guidance.
STRETCHES 01–03
Calves, hamstrings & hips
Match each illustration number with its instructions. Start with a gentle 10-second hold; change sides where applicable, then repeat once.
You’ll need: A low, stable raised surface, such as a step, with a secure handrail or solid wall within easy reach for support.
Wear supportive shoes. Hold the handrail or use the wall for support, and place the balls of your feet on the edge of the raised surface, with your heels free.
Lower your heels slowly until you feel a gentle calf stretch.
Bend one knee slightly to focus the stretch on the opposite calf. Change sides.
Keep in mind: Keep using the support. Lower only within comfort; do not bounce or force your heels down.
STRETCH 02 / Back of the thigh
Hamstring stretch
You’ll need: A staircase with a secure handrail.
Stand on the floor and place one heel on a stair in front of you, with your toes pointing upwards. The illustration uses the second step.
Keep the raised knee comfortably straight without forcing it to lock.
Hold the rail and bend slightly forward from your hips until you feel a gentle stretch behind your thigh. Return slowly and change sides.
Keep in mind: Use a lower step if the second step is too high for comfortable balance or movement. Only a slight forward bend is needed.
STRETCH 03 / Front of the hip
Standing hip stretch
You’ll need: A staircase with a secure handrail.
Stand on the floor and place one foot on a stair in front of you, bending that knee. The illustration uses the second step; your rear foot stays on the floor.
Keep your torso upright and hold the handrail.
Move your hips gently forward until you feel a stretch at the front of the hip of the rear leg. Return and change sides.
Keep in mind: Choose a lower step if needed. Keep the movement small and avoid deeply arching your lower back.
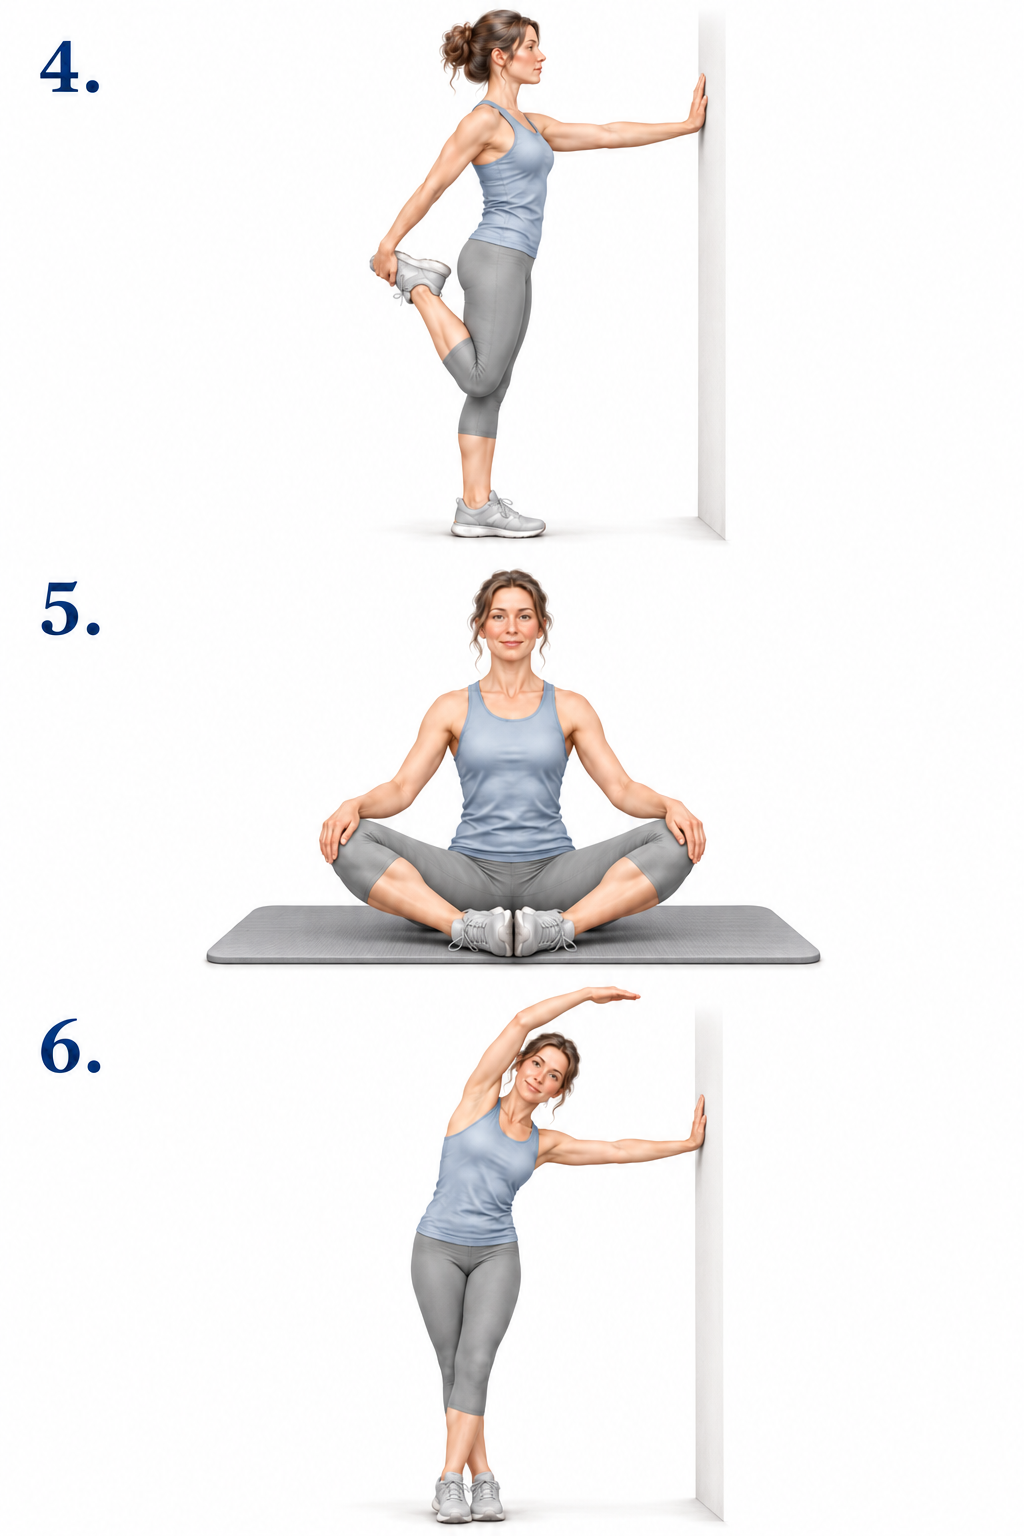
STRETCHES 04–06
Thighs & supported side reach
Match each illustration number with its instructions. Start with a gentle 10-second hold; change sides where applicable, then repeat once.
Stand beside your support and hold it with one hand.
Bend the other knee and hold that foot or ankle with the hand on the same side.
Bring the heel gently towards your buttock, keeping the knee pointing down and your body upright. Release slowly and change sides.
Keep in mind: Do not force your heel to touch your buttock. If you cannot reach comfortably, leave this stretch out and seek an appropriate alternative.
STRETCH 05 / Inner thighs
Seated inner-thigh stretch
You’ll need: A comfortable floor mat.
Sit on the mat and bring the soles of your feet together.
Bring your feet towards you only as far as comfortable, letting your knees open to the sides.
Sit upright and allow a gentle stretch along the inner thighs. Rest your hands lightly near your knees.
Keep in mind: Do not press your knees down or force them towards the floor.
STRETCH 06 / Outer hip and side of the trunk
Supported side stretch
You’ll need: A fixed support within easy reach.
Stand beside the support and cross one leg lightly in front of the other.
Keep one hand on the support and raise the other arm overhead.
Bend gently to the side opposite the front leg. Keep your feet grounded, then uncross and change sides.
Keep in mind: Maintain a stable stance. Leave this position out if crossing your legs makes you unsteady.
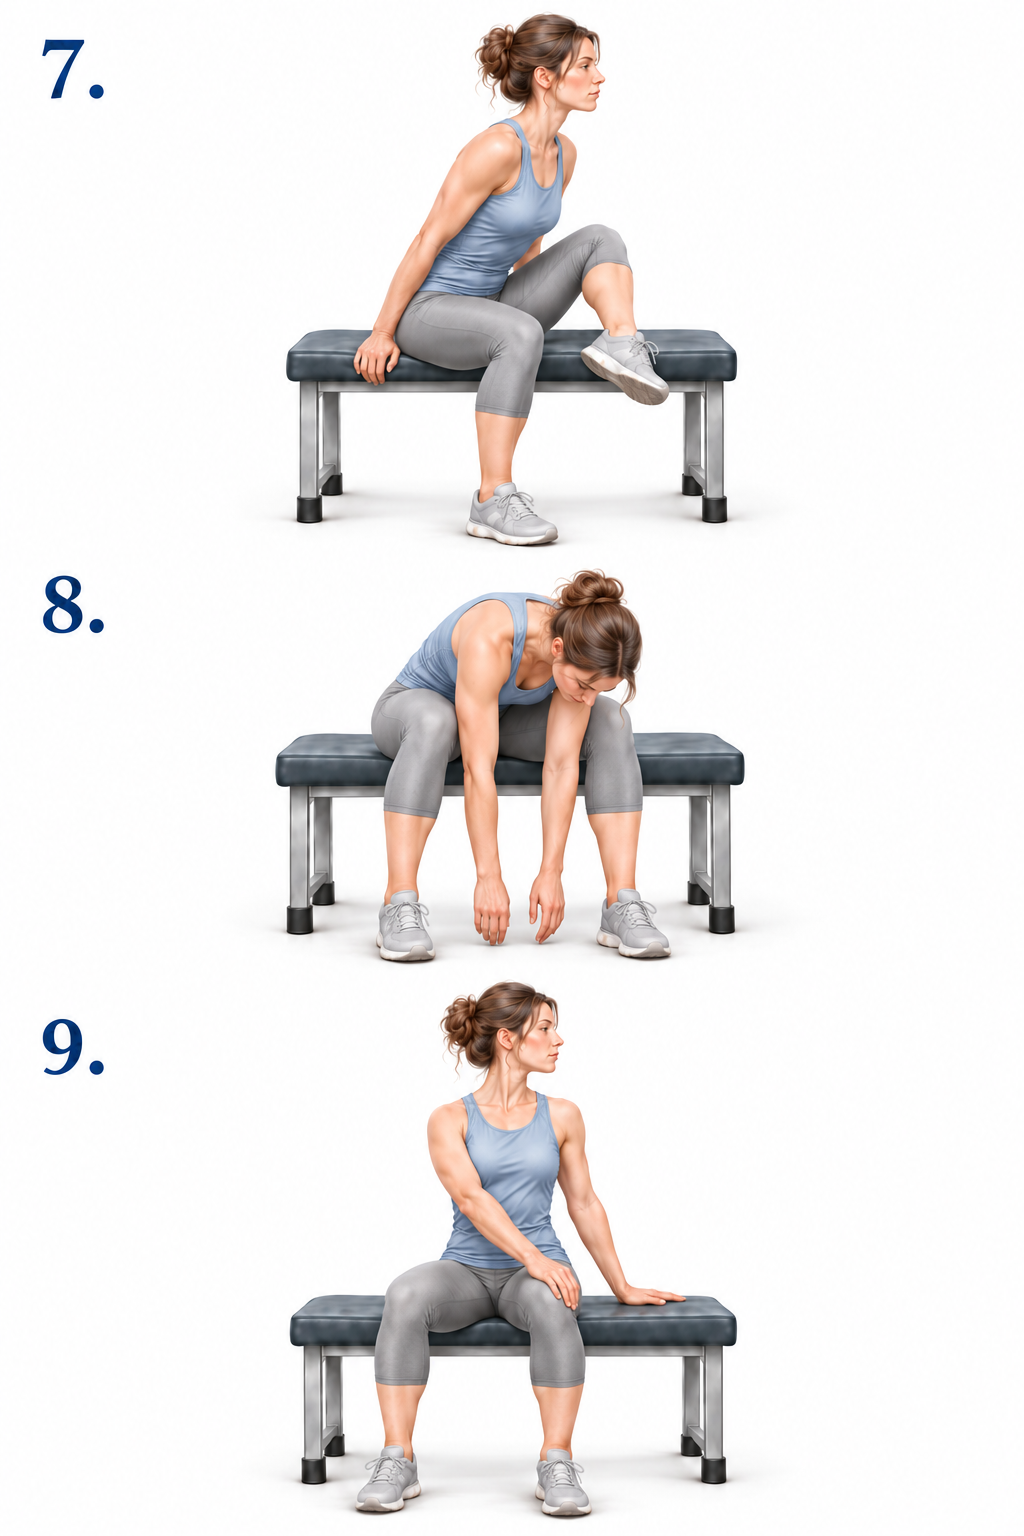
STRETCHES 07–09
Three seated stretches
Match each illustration number with its instructions. Start with a gentle 10-second hold; change sides where applicable, then repeat once.
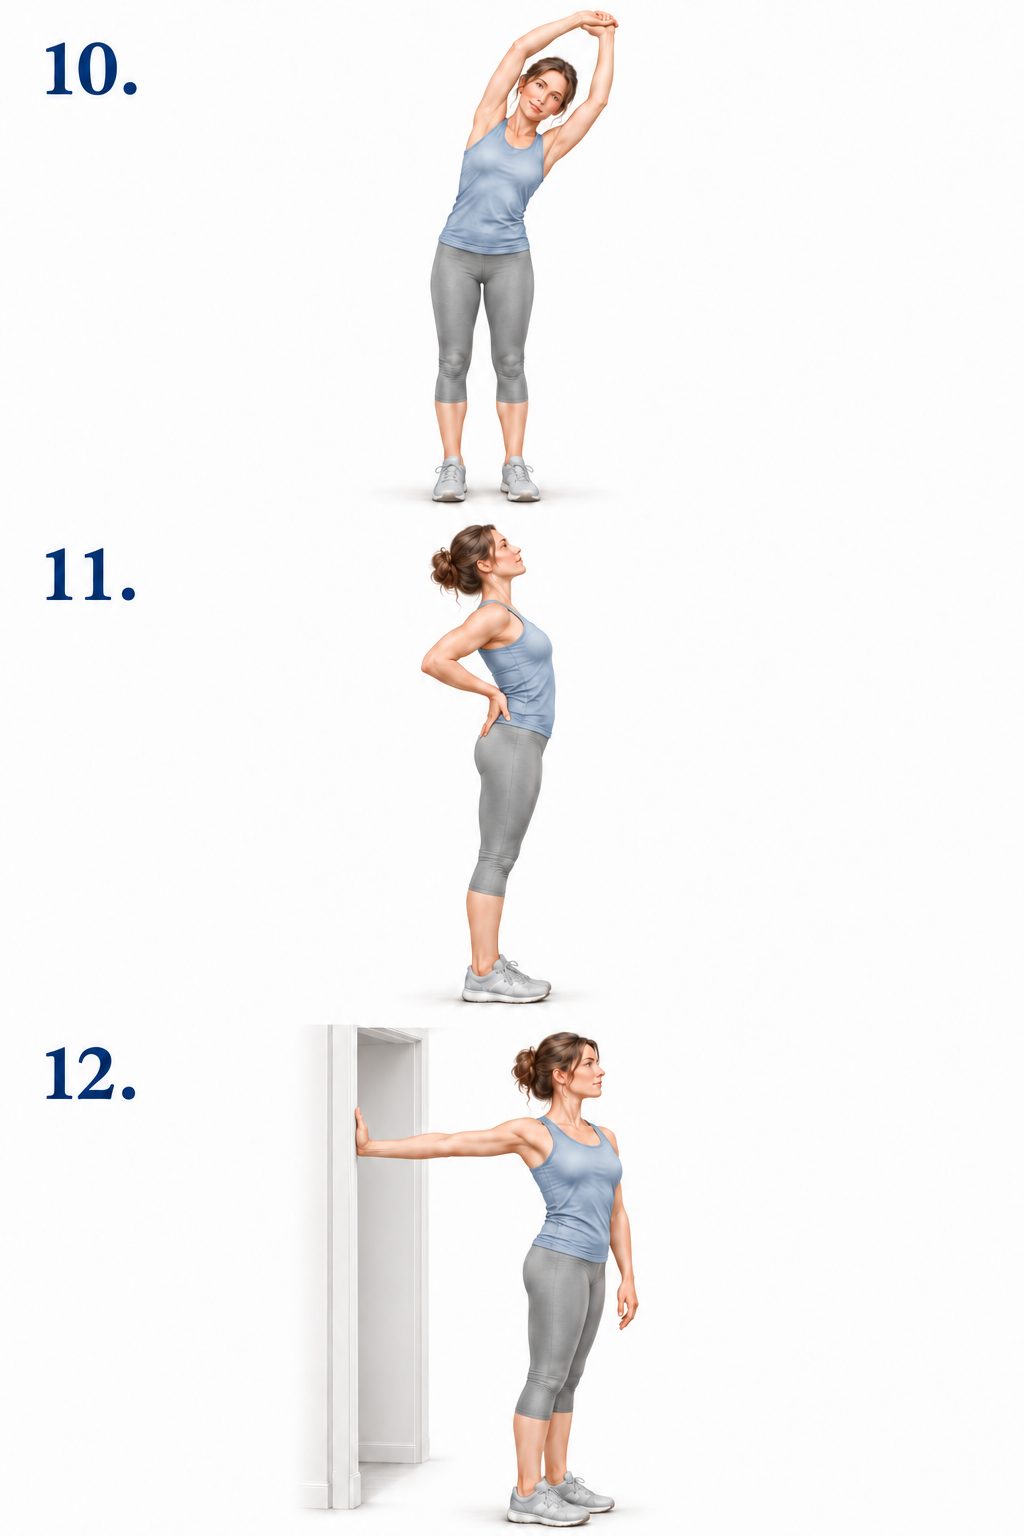
Stand with your feet comfortably apart and raise your arms overhead.
Hold one wrist with the opposite hand.
Reach gently towards the side of the holding hand, allowing a small side bend. Return upright and change sides.
Keep in mind: Keep both feet on the floor. Guide the wrist gently rather than pulling hard.
STRETCH 11 / Front of the trunk and hips
Gentle standing extension
You’ll need: A clear, stable standing area.
Stand with your feet comfortably apart and place your hands on your lower back.
Keep your knees soft and use your hands for support.
Lift your chest and lean back a small, comfortable amount. Return upright slowly.
Keep in mind: Avoid a deep backbend or throwing your head backwards. Stop if this brings on back or leg symptoms.
STRETCH 12 / Chest and front of the shoulder
Supported chest stretch
You’ll need: A secure doorway with an accessible inner doorframe.
Place your hand upright against the inside face of the doorframe at about shoulder height. Your fingers extend into the doorway, with your thumb visible on the edge.
Keep that hand in place and slowly turn your feet and body away from the arm.
Allow your head to follow your body comfortably. Stop at a gentle stretch across the chest, then return and change sides.
Keep in mind: Keep your wrist naturally aligned with your forearm and your shoulder comfortable. Do not force the arm behind you.
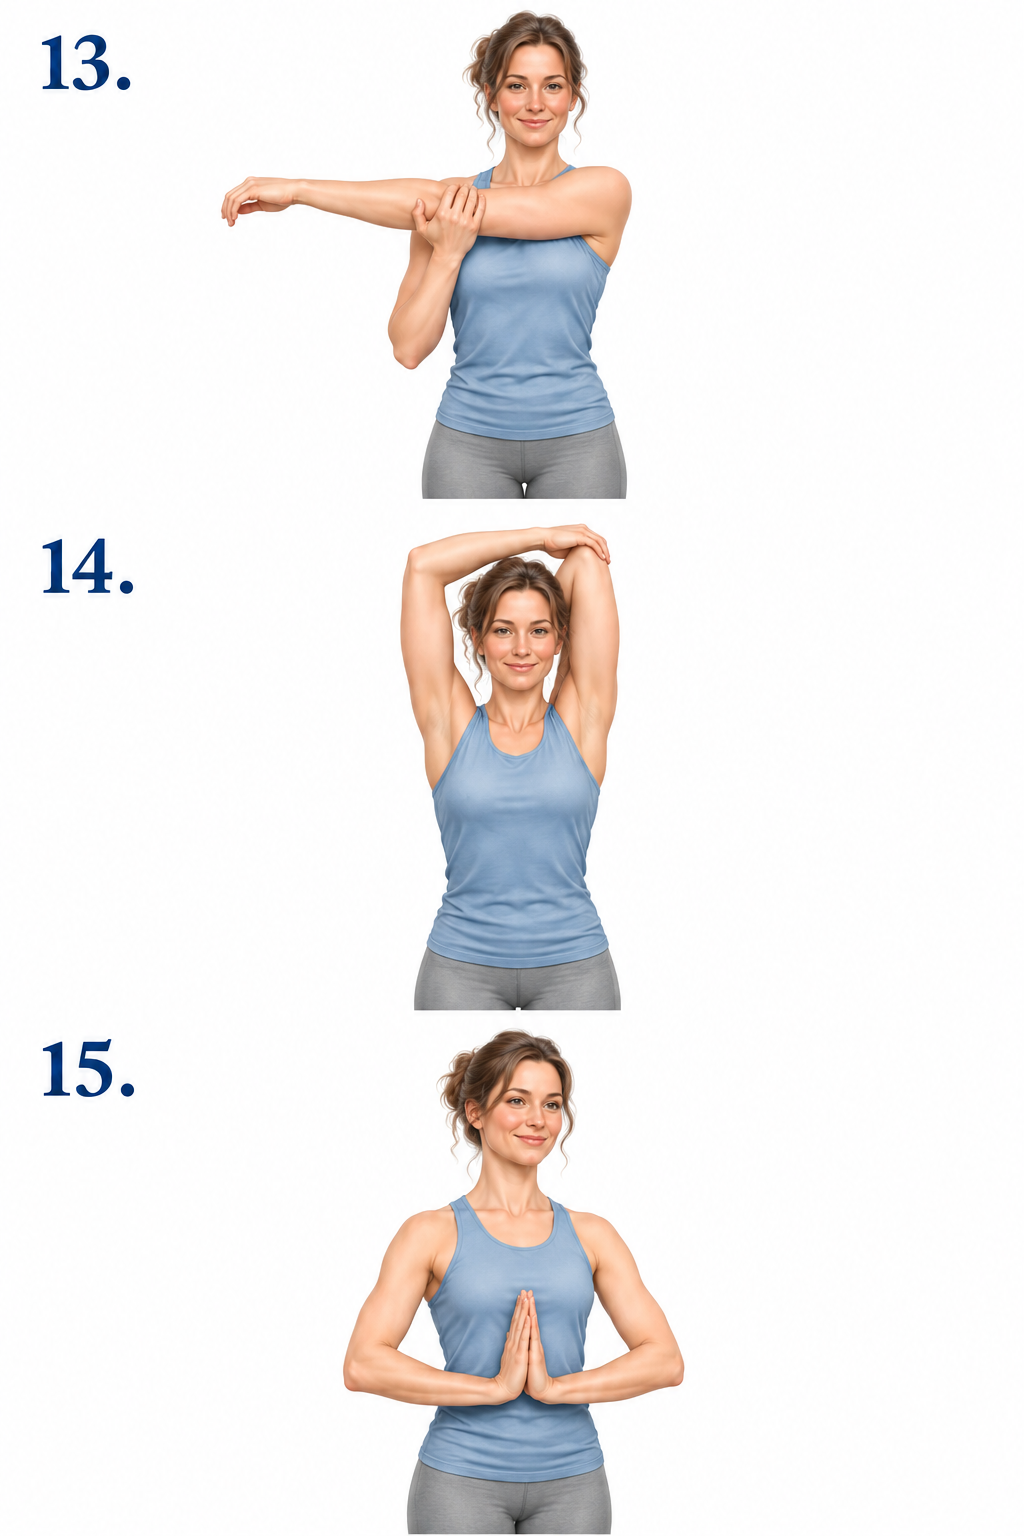
STRETCHES 13–15
Shoulder, upper arm & forearms
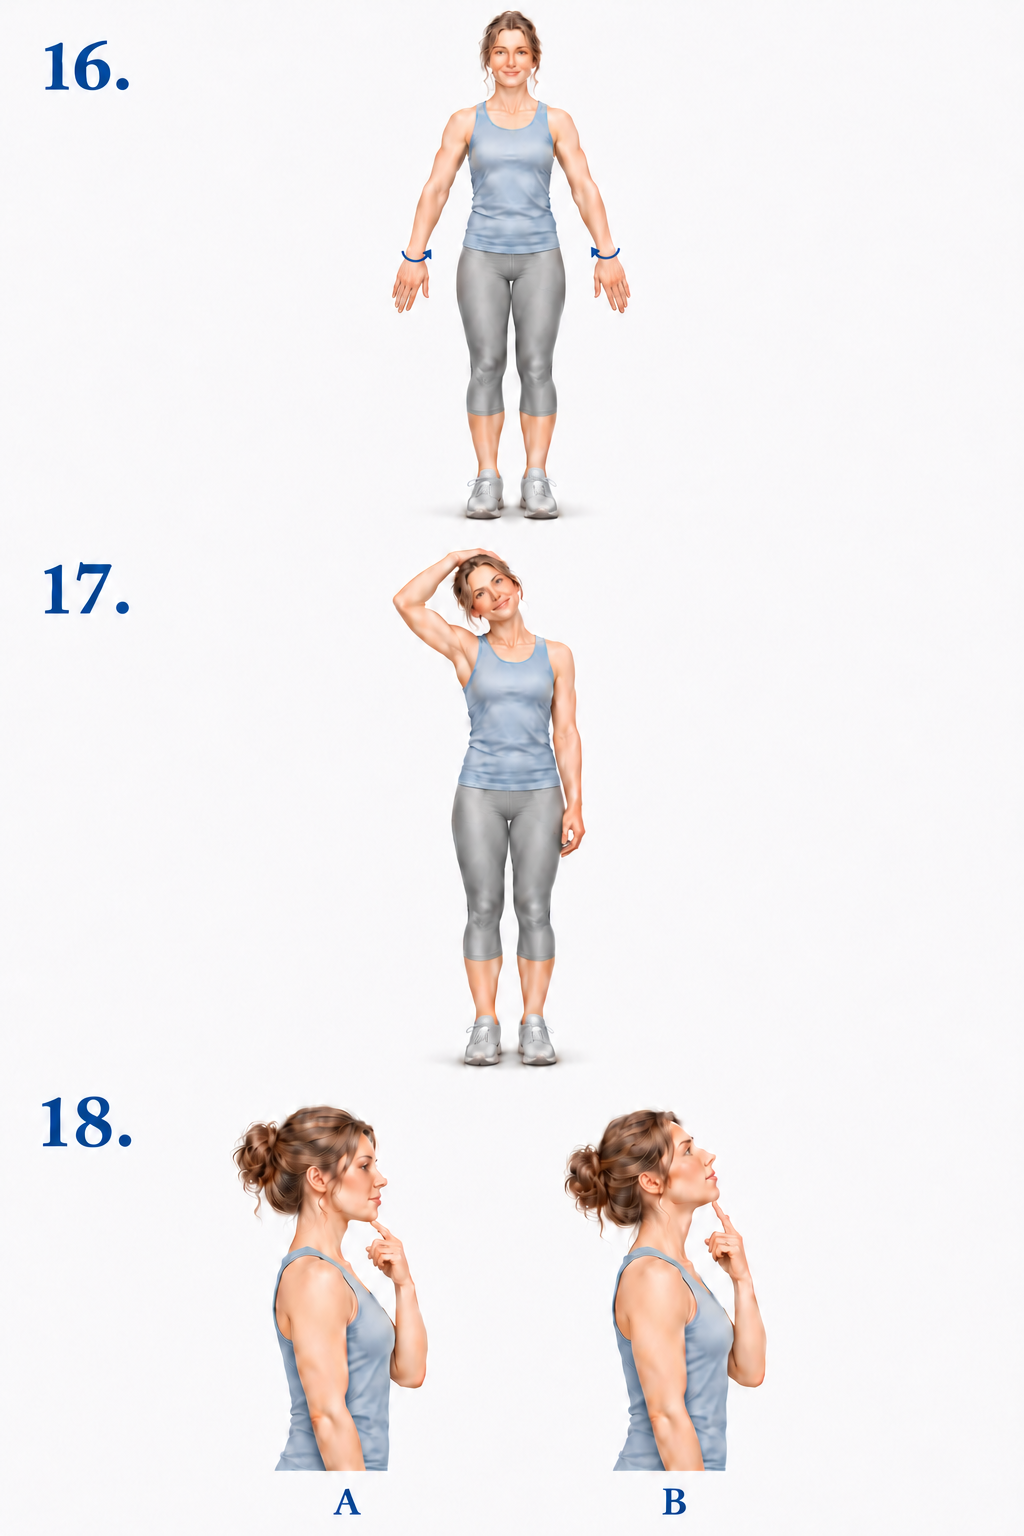
Match each illustration number with its instructions. Start with a gentle 10-second hold; change sides where applicable, then repeat once.
Let your arms rest beside your body with your elbows comfortably straight.
Turn your hands inwards, allowing your forearms to turn with them. Keep your upper arms relaxed and your elbows comfortably straight.
Keep the movement small and your shoulders relaxed. Return slowly.
Keep in mind: The arrows wrap halfway around the wrists: right thumb counterclockwise and left thumb clockwise in the illustrated view. Avoid locking your elbows or forcing your wrists.
STRETCH 17 / Side of the neck
Gentle neck side stretch
You’ll need: A steady, comfortable position.
Look forwards and relax your shoulders.
Tilt your head gently towards one shoulder while keeping the opposite shoulder down.
If comfortable, rest your hand lightly on your head without pulling. Return to the middle and change sides.
Keep in mind: Your hand is a light resting contact, not a lever. Stop if you feel pain, dizziness, tingling or numbness.
STRETCH 18 / Front of the neck
Chin tuck and gentle neck extension
You’ll need: A steady position with your shoulders relaxed.
A: Gently draw your chin back, keeping your gaze level.
B: Keep that small chin tuck as you tip your head back only a little, within a comfortable range.
Return to the level position slowly. Keep breathing and avoid forcing the movement.
Keep in mind: This movement is not suitable for every neck problem. If you have neck symptoms, obtain individual guidance before trying it; stop for pain, dizziness, tingling or numbness.
About this routine
This routine includes 18 stretches with a 10-second starting hold. Instructions have been edited for clarity and comfortable-range guidance, and the illustrations redrawn in the Dr Posture exercise style. This is an author-review edition.
General stretching guidance and sources
Hold times and suitable movements vary with the person and the purpose. The 10-second hold here belongs to this routine; it is not a universal prescription. These general guidance sources support gentle, controlled stretching and individual adaptation, rather than validating this complete sequence.