AN INTERACTIVE GUIDE / DR DAVID SHAHAR

Reform or Deform™

Your body responds
to how you use it.

Posture changes how your body carries load. Repeated demands, your physical capacity and time to recover all help shape the response.

Reform or Deform™ is Dr Shahar’s invitation to care for that process throughout life. The aim is to support movement and function—not to hold one perfect pose.

01 / START WITH ONE REGION

Explore the connections.

Choose a numbered point or a region below. See the anatomy and illustrated changes, enlarge the drawings, and read the full findings and practical actions.

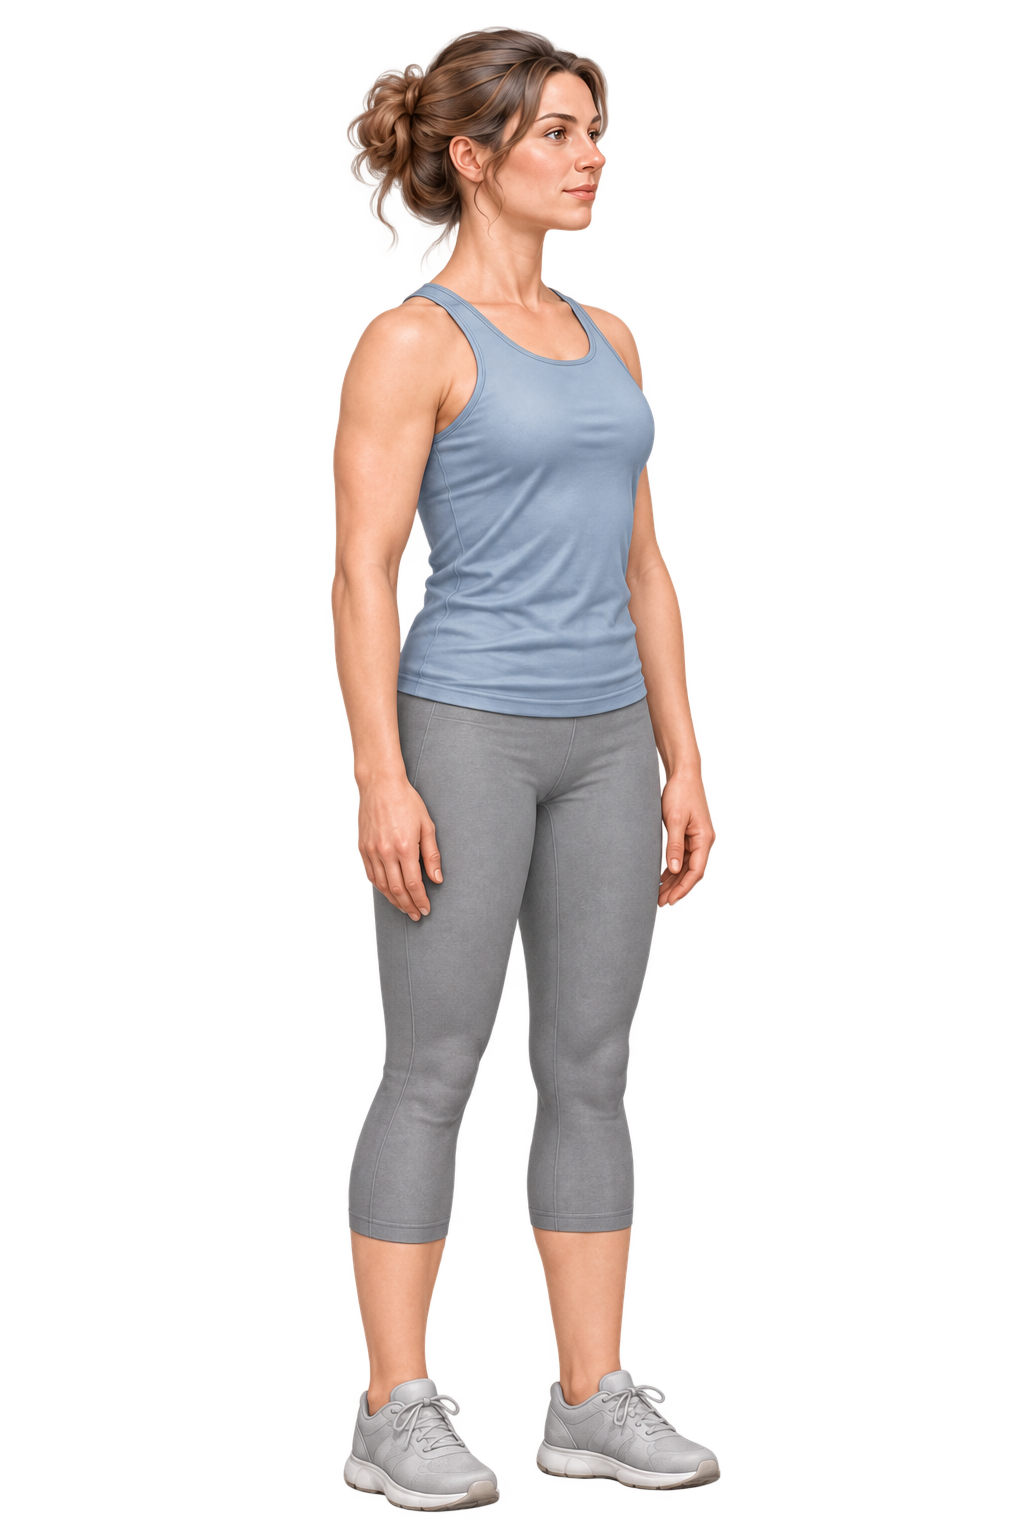
The Dr Posture exercise woman standing comfortably, used as a guide to broad body regions
Region guide, not an assessment of this person’s health.

01 / Head & neck

Your head has weight.

Looking, reading and reaching change where that weight sits. Your neck muscles and joints respond to the demand.

LOOK INSIDE

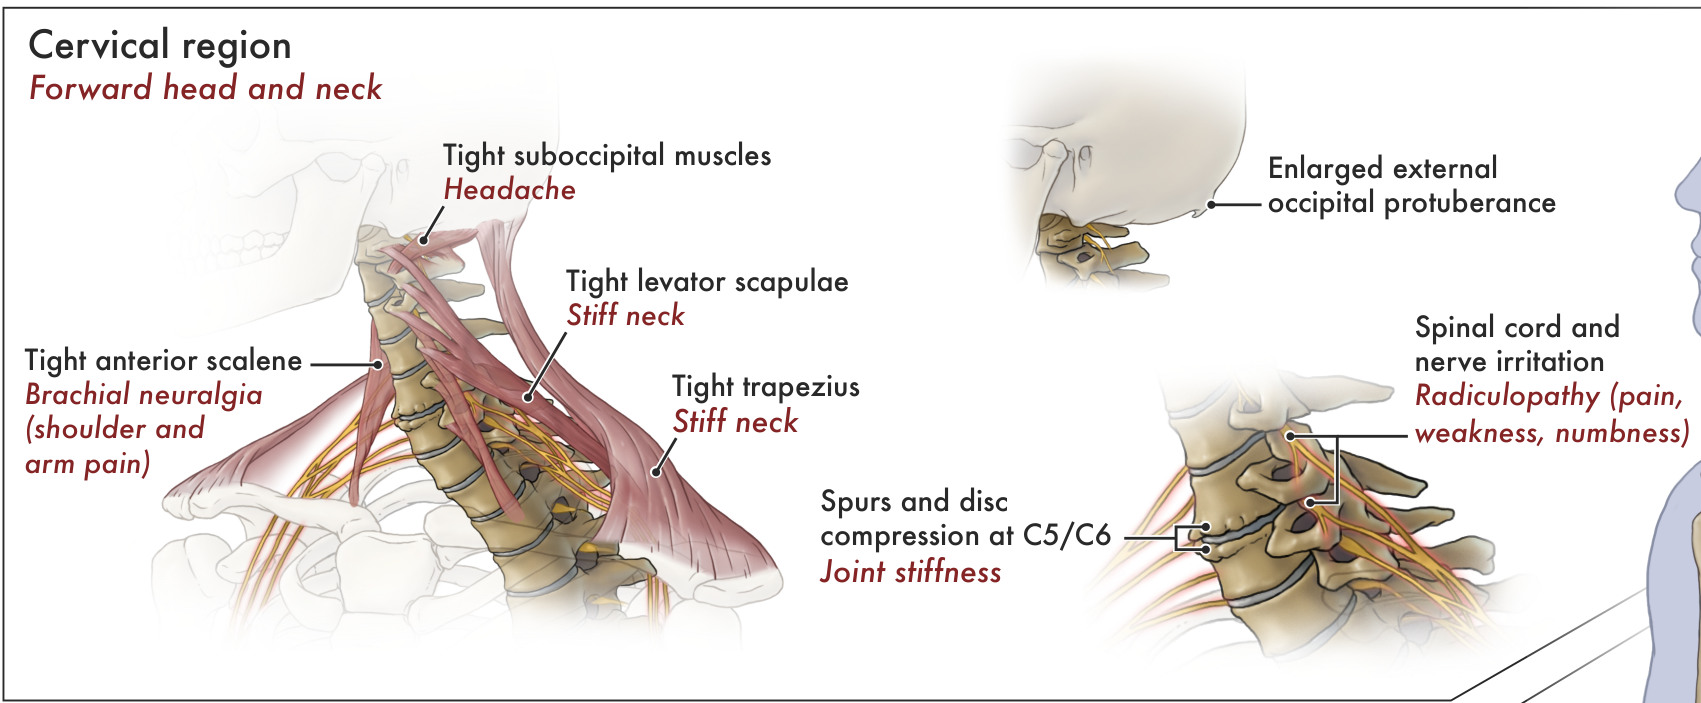
Muscles, bones and nerves of the neck
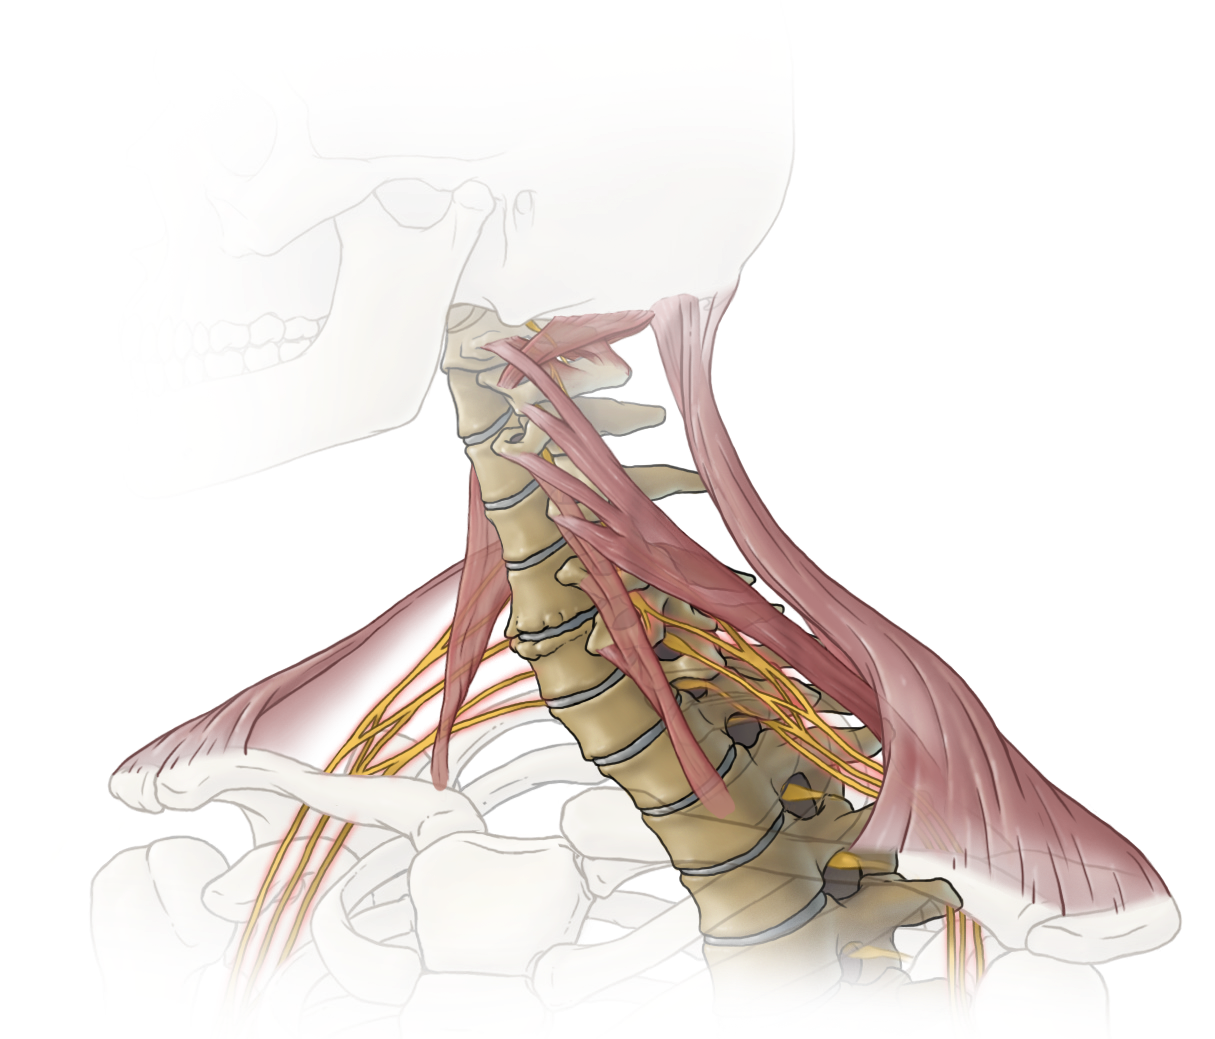
Original poster illustration: Muscles, bones and nerves of the neckEnlarge illustration

What to look for

  • Muscles. See the bands running between the skull, neck and shoulder blade.
  • Bones and discs. The vertebrae stack above one another, with discs between their bodies.
  • Nerves. The yellow branches pass out from the neck towards the shoulder and arm.
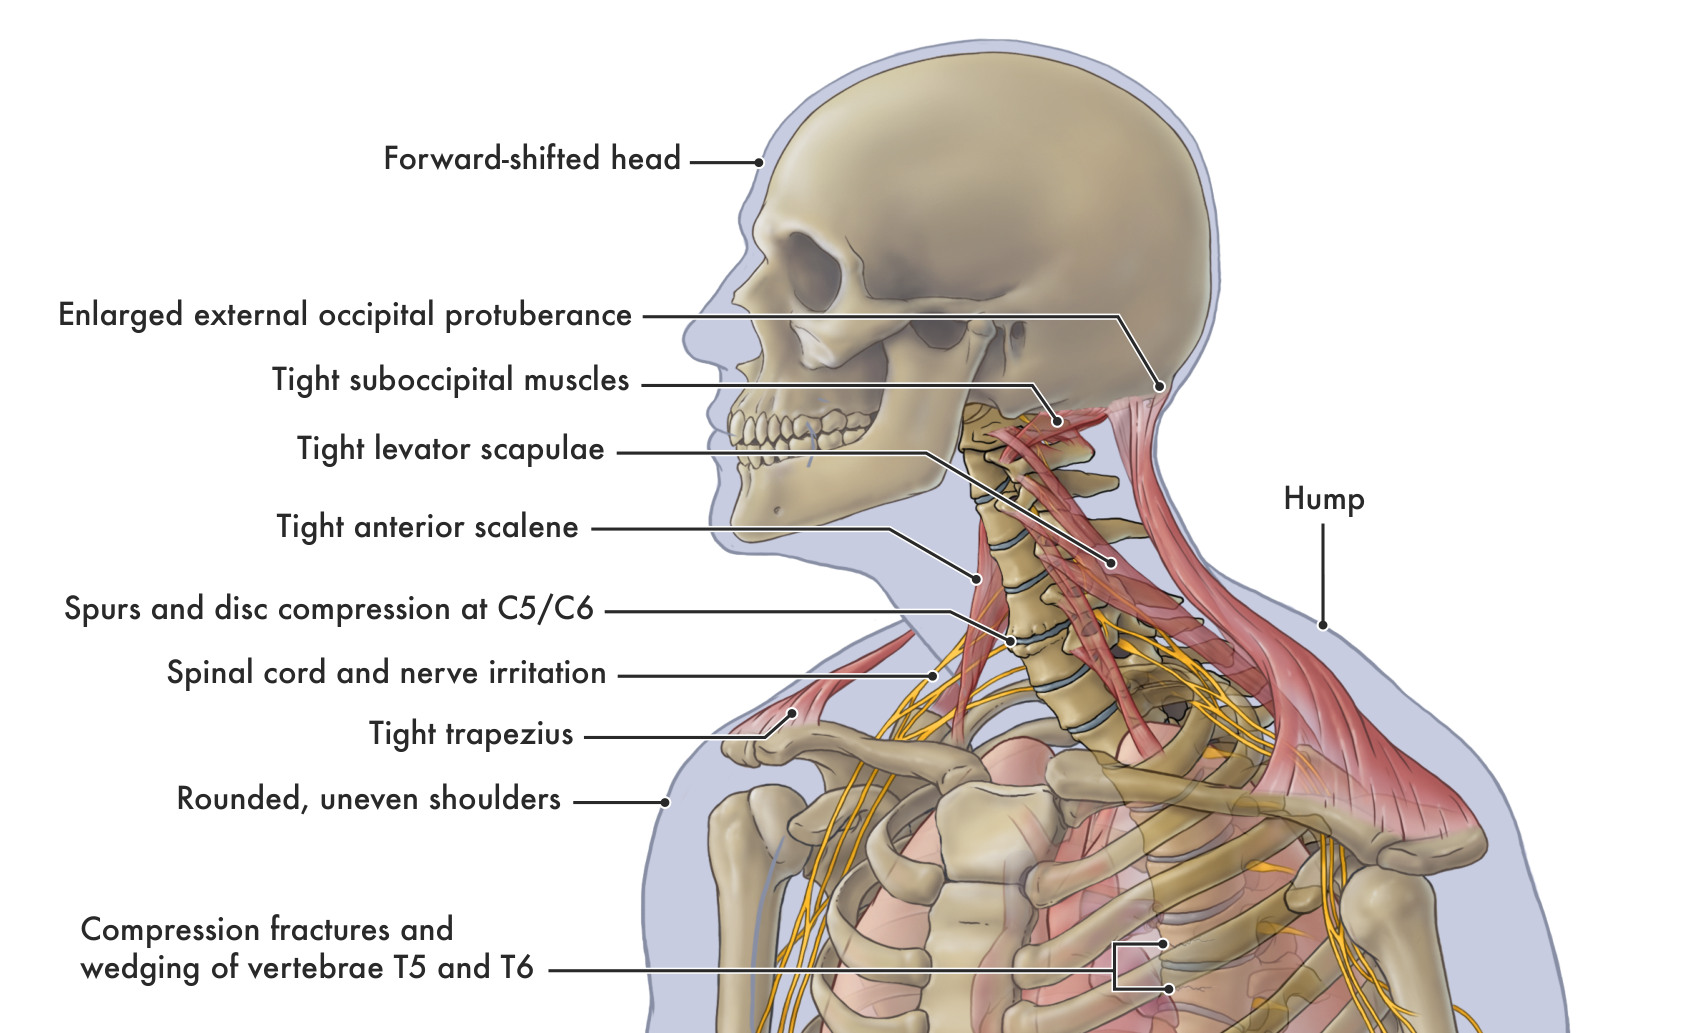
See the original labels ↗
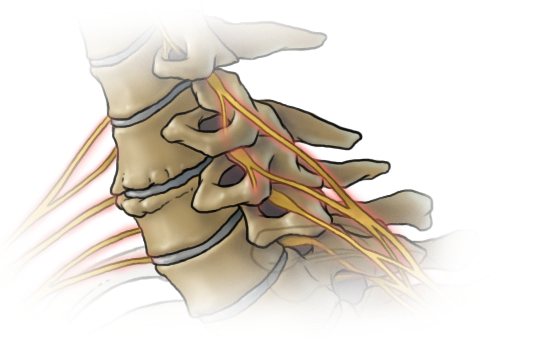
Original poster illustration: C5/C6: bone spurs and reduced disc spaceEnlarge illustration
C5/C6: bone spurs and reduced disc space
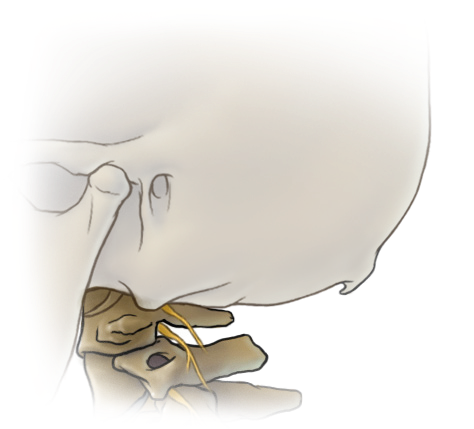
Original poster illustration: The enlarged bony prominence at the back of the skullEnlarge illustration
The enlarged bony prominence at the back of the skull

Original poster artwork © Natalie Koscal, 2014; words and concept © Dr David Shahar. Illustrated findings, not patient scans. Read the clinical explanations below.

  • What may change. A sustained forward position can change muscular demand. Neck discomfort, stiffness and some headaches have several possible contributors; posture is one part of the assessment.
  • What the evidence says. Forward-head posture is associated with neck pain in adults in observational studies. This does not establish that the position caused the pain, and the findings do not apply equally to children.
  • A useful first step. Bring reading material into comfortable view and support your arms. Make room to turn, move and change tasks.

Findings and symptoms in the original poster

  • Forward head and neck. The head sits farther forward relative to the trunk. The poster pairs this finding with headache and a stiff neck.
  • Tight suboccipital muscles. These small muscles sit beneath the back of the skull. The associated symptom in the poster is headache.
  • Tight levator scapulae. This muscle connects the upper neck to the shoulder blade. The poster notes neck stiffness.
  • Tight trapezius. This broad muscle spans the neck and upper back. The poster notes neck stiffness.
  • Enlarged external occipital protuberance. An enlarged bony prominence at the back of the skull. This finding remains part of the guide and links to Dr Shahar’s related research.
  • Bone spurs and disc compression at C5/C6. The poster identifies bony growths and reduced disc space between the fifth and sixth neck vertebrae, alongside joint stiffness.
  • Nerve-root irritation and radiculopathy. Radiculopathy refers to a problem affecting a spinal nerve root. The poster lists pain, weakness and numbness as associated symptoms.
  • Spinal cord irritation or compression. The spinal cord is also named in the poster. A cord problem is distinct from nerve-root radiculopathy and can affect hand function, walking or balance; it requires clinical assessment.
How to interpret these findings

The original poster names the suboccipitals, anterior scalenes, levator scapulae and trapezius: muscles around the skull, neck and shoulders. It also illustrates C5–C6 disc-height changes and bone spurs. A feeling of tightness does not identify its cause, and a drawing cannot diagnose these changes. The enlarged external occipital protuberance is a bony feature at the back of the skull; its presence alone does not establish pain or a postural cause. Read Dr Shahar’s related research.
Sources behind this explanation
Review your desk setup ↗

02 / Shoulders & arms

Your reach changes the work.

The same object usually creates a greater turning demand when held farther from your shoulder. Your own arms have weight too.

LOOK INSIDE

The neck, shoulder girdle and upper chest

Original poster illustration: The neck, shoulder girdle and upper chestEnlarge illustration

What to look for

  • Follow the labels. Locate the shoulder blade, collarbone, neck muscles and yellow nerve branches.
  • See the relationship. The illustration brings the head, neck, shoulders and rib cage into one view.

Original poster artwork © Natalie Koscal, 2015; words and concept © Dr David Shahar. Illustrated findings, not patient scans. Read the clinical explanations below.

  • What may change. Long reaches and unsupported arms can increase the work needed to hold a position. Support can carry some of that load.
  • Symptoms and function. Shoulder pain, stiffness, arm pain, tingling and weakness can affect reaching, carrying and daily work. These symptoms and any joint changes deserve individual assessment.
  • A useful first step. Move frequently used objects closer. Let a suitable surface support your forearms without forcing your shoulders upwards.

Findings and symptoms in the original poster

  • Tight anterior scalene muscles and brachial neuralgia. The anterior scalenes are at the front and sides of the neck. The poster associates tightness here with “brachial neuralgia”: nerve pain felt in the shoulder or arm.
  • Rounded shoulders. A forward-rounded shoulder position is paired with upper-back pain and stiffness in the poster.
  • Uneven shoulders. Different shoulder heights are shown alongside shoulder pain and arthritis. Arthritis is a joint condition assessed separately from the visible shoulder position.
How to interpret these findings

The poster uses “brachial neuralgia” for shoulder or arm nerve pain and links it to the anterior scalene muscles. Several conditions can cause arm symptoms, including irritation of a nerve root in the neck. A single muscle label cannot establish the source. Shoulder appearance also varies between people.

Sources behind this explanation
Try the 5 kg bag example ↗

03 / Chest & upper back

Your rib cage moves as you breathe.

The upper back supports the rib cage. A pronounced spinal curve can affect how this region moves.

LOOK INSIDE

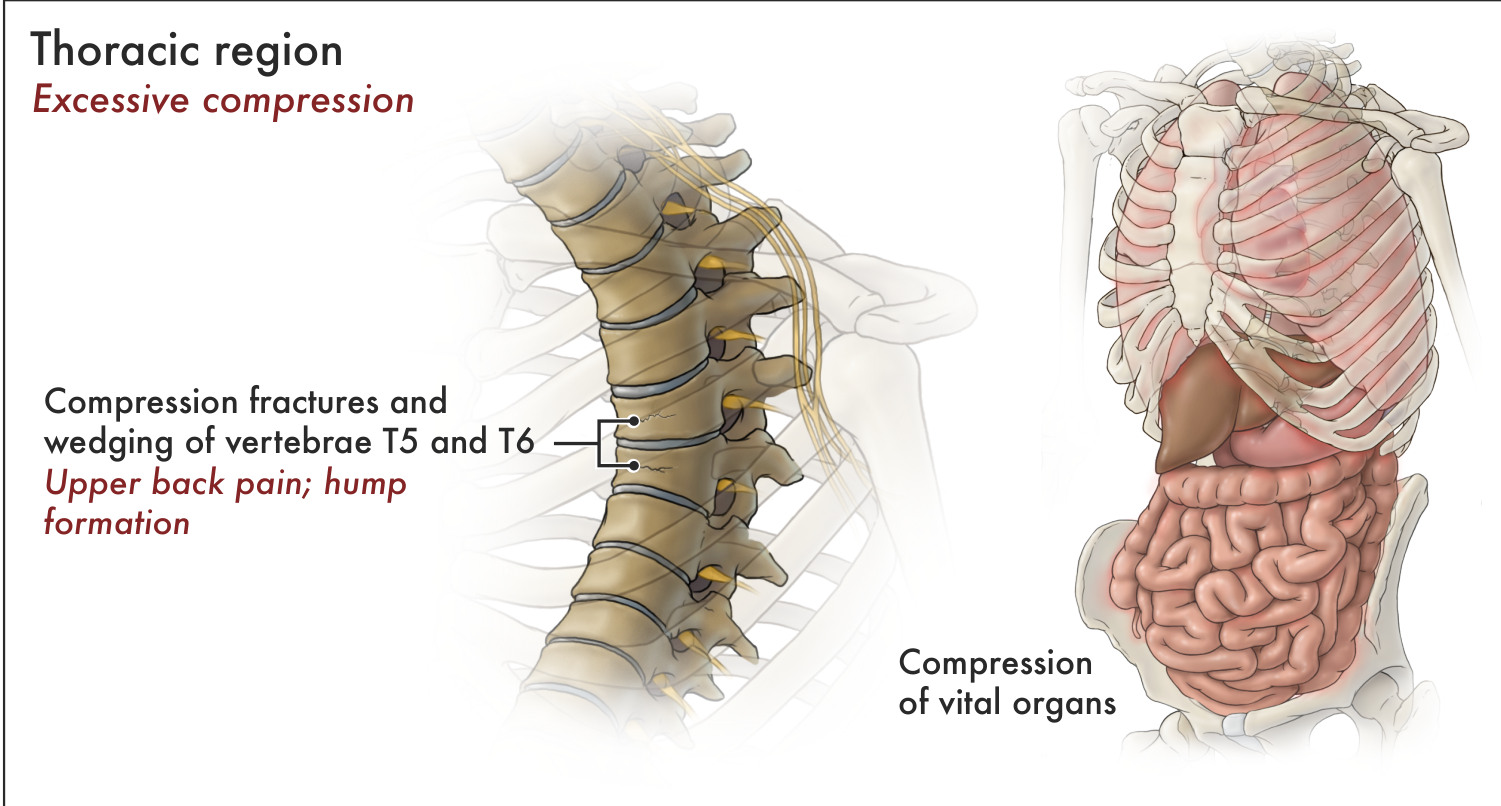
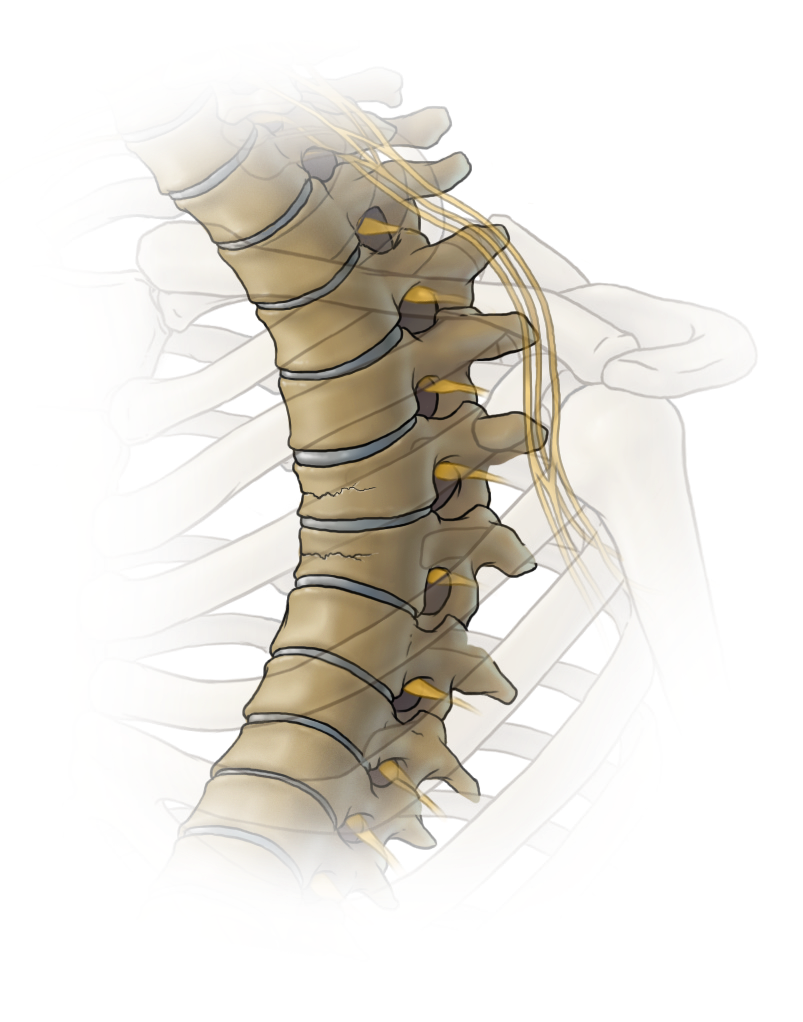
A closer view of vertebral wedging

Original poster illustration: A closer view of vertebral wedgingEnlarge illustration

What to look for

  • T5 and T6. These are the two mid-back vertebrae identified in the original poster.
  • Fracture and wedge shape. Look at the fracture lines and the reduced height at the front of the illustrated vertebral bodies.
  • Nearby nerves. Yellow nerve branches lie close to the bony structures.
See the original labels ↗
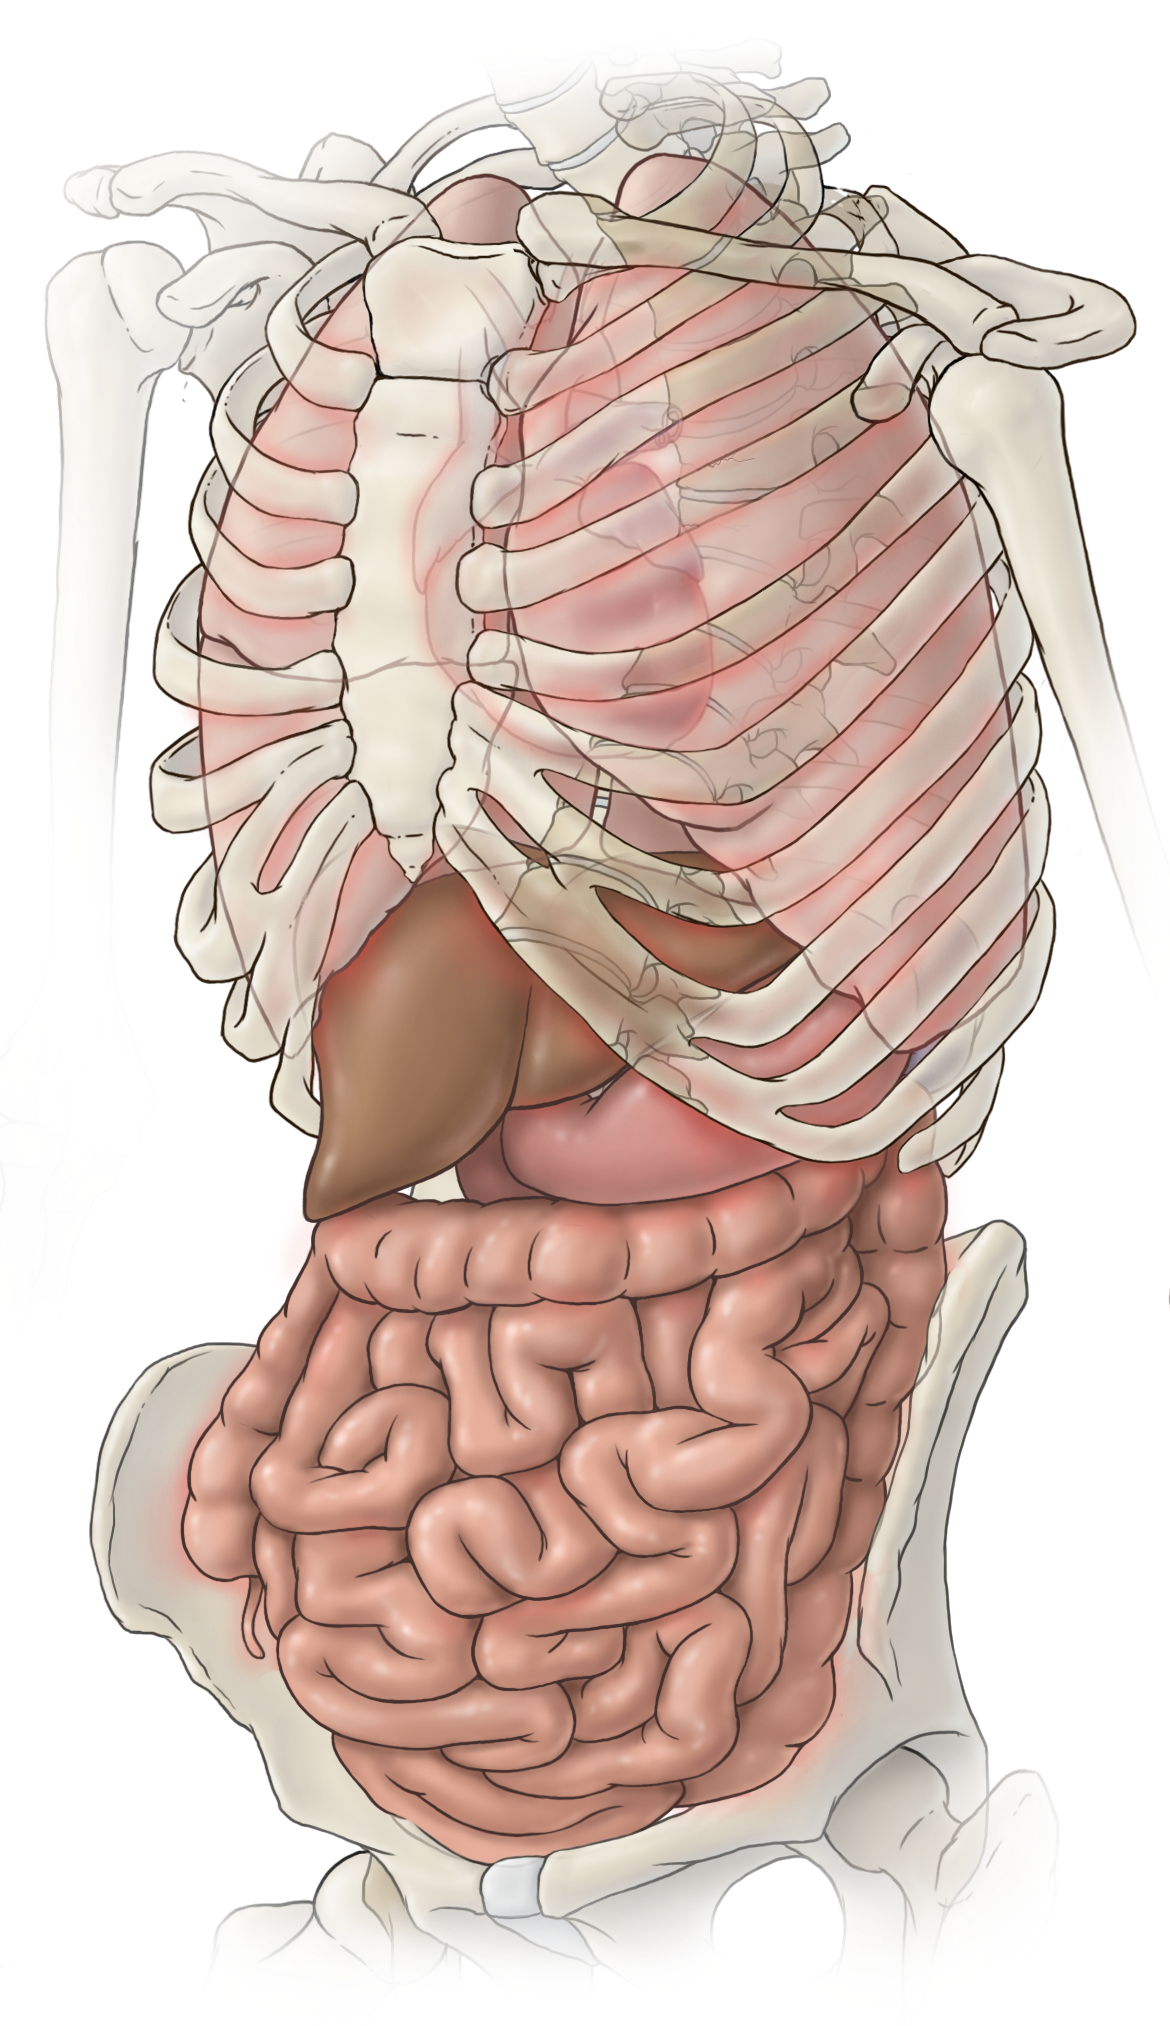
Original poster illustration: Rib cage and internal organs: the poster’s proposed spatial explanationEnlarge illustration
Rib cage and internal organs: the poster’s proposed spatial explanation

The organ drawing preserves the poster’s proposed explanation. It is not a measurement of organ pressure or function.

Original poster artwork © Natalie Koscal, 2014; words and concept © Dr David Shahar. Illustrated findings, not patient scans. Read the clinical explanations below.

  • What may change. Excessive upper-back rounding can be flexible, structural or a combination. Vertebral compression fractures can contribute to loss of height and a more rounded back.
  • Breathing and posture. A long-term study linked greater kyphosis with faster lung-function decline in older women; it did not show the same result in men. It did not test the Manubrium Lift.
  • A useful first step. Allow comfortable breathing and movement. Seek assessment for a new change in spinal shape, loss of height or unexplained back pain, particularly if bone health is a concern.

Findings and symptoms in the original poster

  • Excessive thoracic compression. The poster highlights increased compressive demand in the mid-back as a mechanical concern.
  • Compression fractures and wedging at T5 and T6. The fifth and sixth mid-back vertebrae are specifically illustrated. A compression fracture can reduce the height of a vertebral body; greater height loss at the front gives it a wedge shape. The poster pairs these changes with upper-back pain and hump formation.
  • Upper-back hump, pain and stiffness. The poster shows pronounced upper-back rounding together with pain and stiffness. Clinical examination considers both flexible posture and structural changes.
  • Decreased lung capacity. Restricted breathing capacity is an important concern in pronounced spinal curvature. The poster includes it; the research link below explains what has been measured in older adults.
  • Abdominal prominence — “pot belly”. This visible feature is retained from the poster. Abdominal appearance is one part of the overall assessment and does not, by itself, measure internal pressure or organ function.
  • “Compression of vital organs”. The poster describes compression of internal organs as a concern. This remains identified as Dr Shahar’s proposed mechanical explanation: changes in trunk shape may alter the space available to internal structures. Whether there is harmful compression or impaired organ function needs separate clinical evidence.
How to interpret these findings

The poster illustrates wedging at T5–T6, a rounded upper back, reduced lung capacity and compression of internal organs. Those spinal levels are examples, not a rule. A visible curve or abdominal shape cannot tell us that organs are being damaged. The Manubrium Lift has not been shown here to decompress organs or increase measured lung capacity.

Sources behind this explanation
Understand supported upper-back positioning ↗

04 / Lower back & pelvis

The lower back and pelvis work together.

Bending, standing and lifting change the demands on the lower spine. The response depends on the load, the person and recovery.

LOOK INSIDE

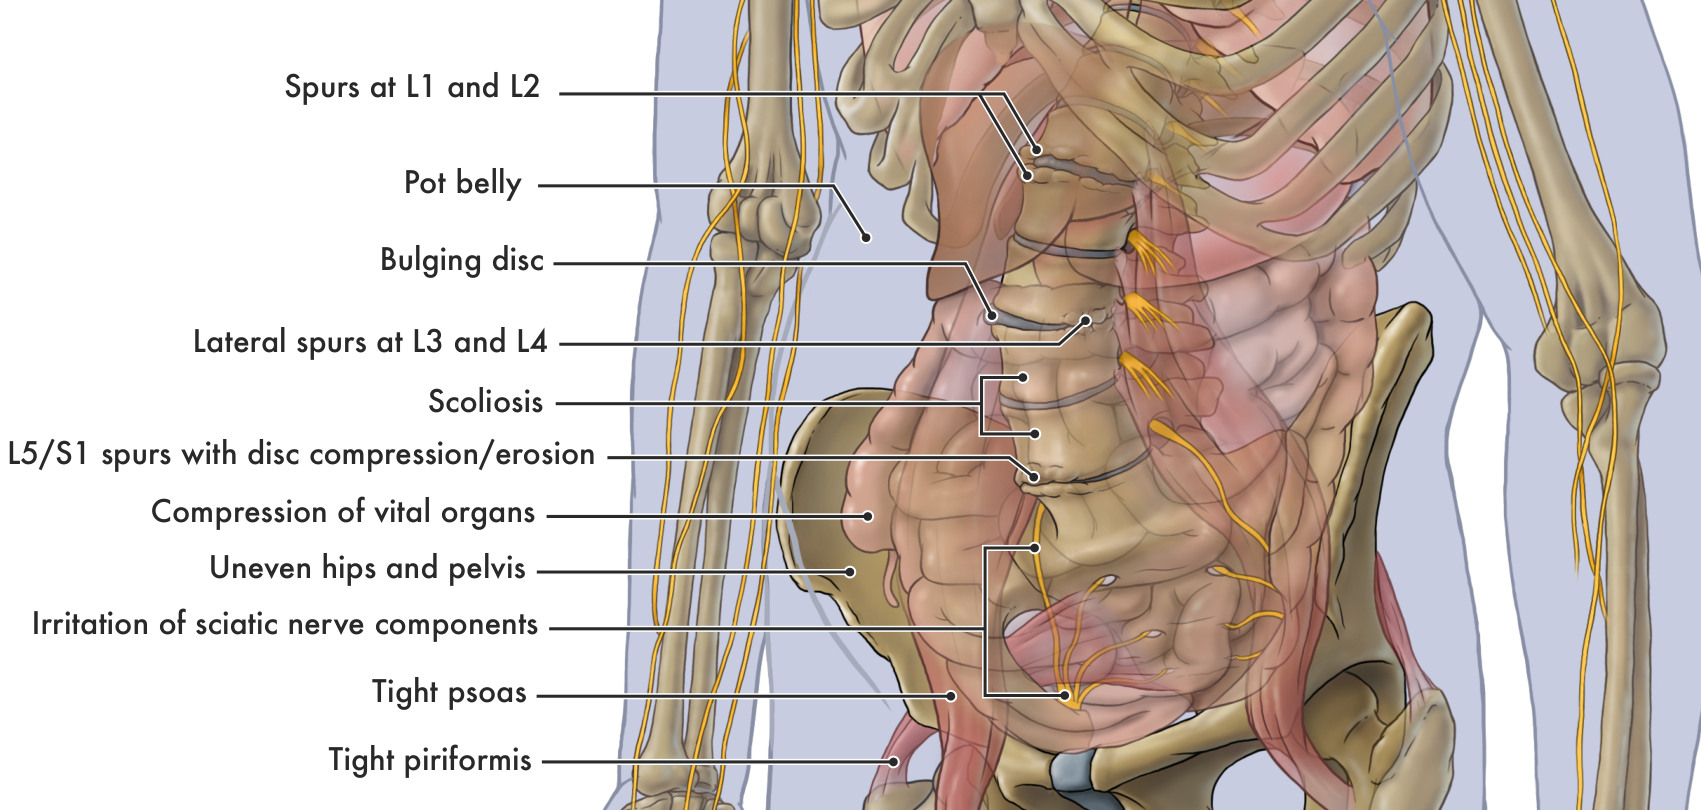
See the discs, bone spurs and nerve pathways

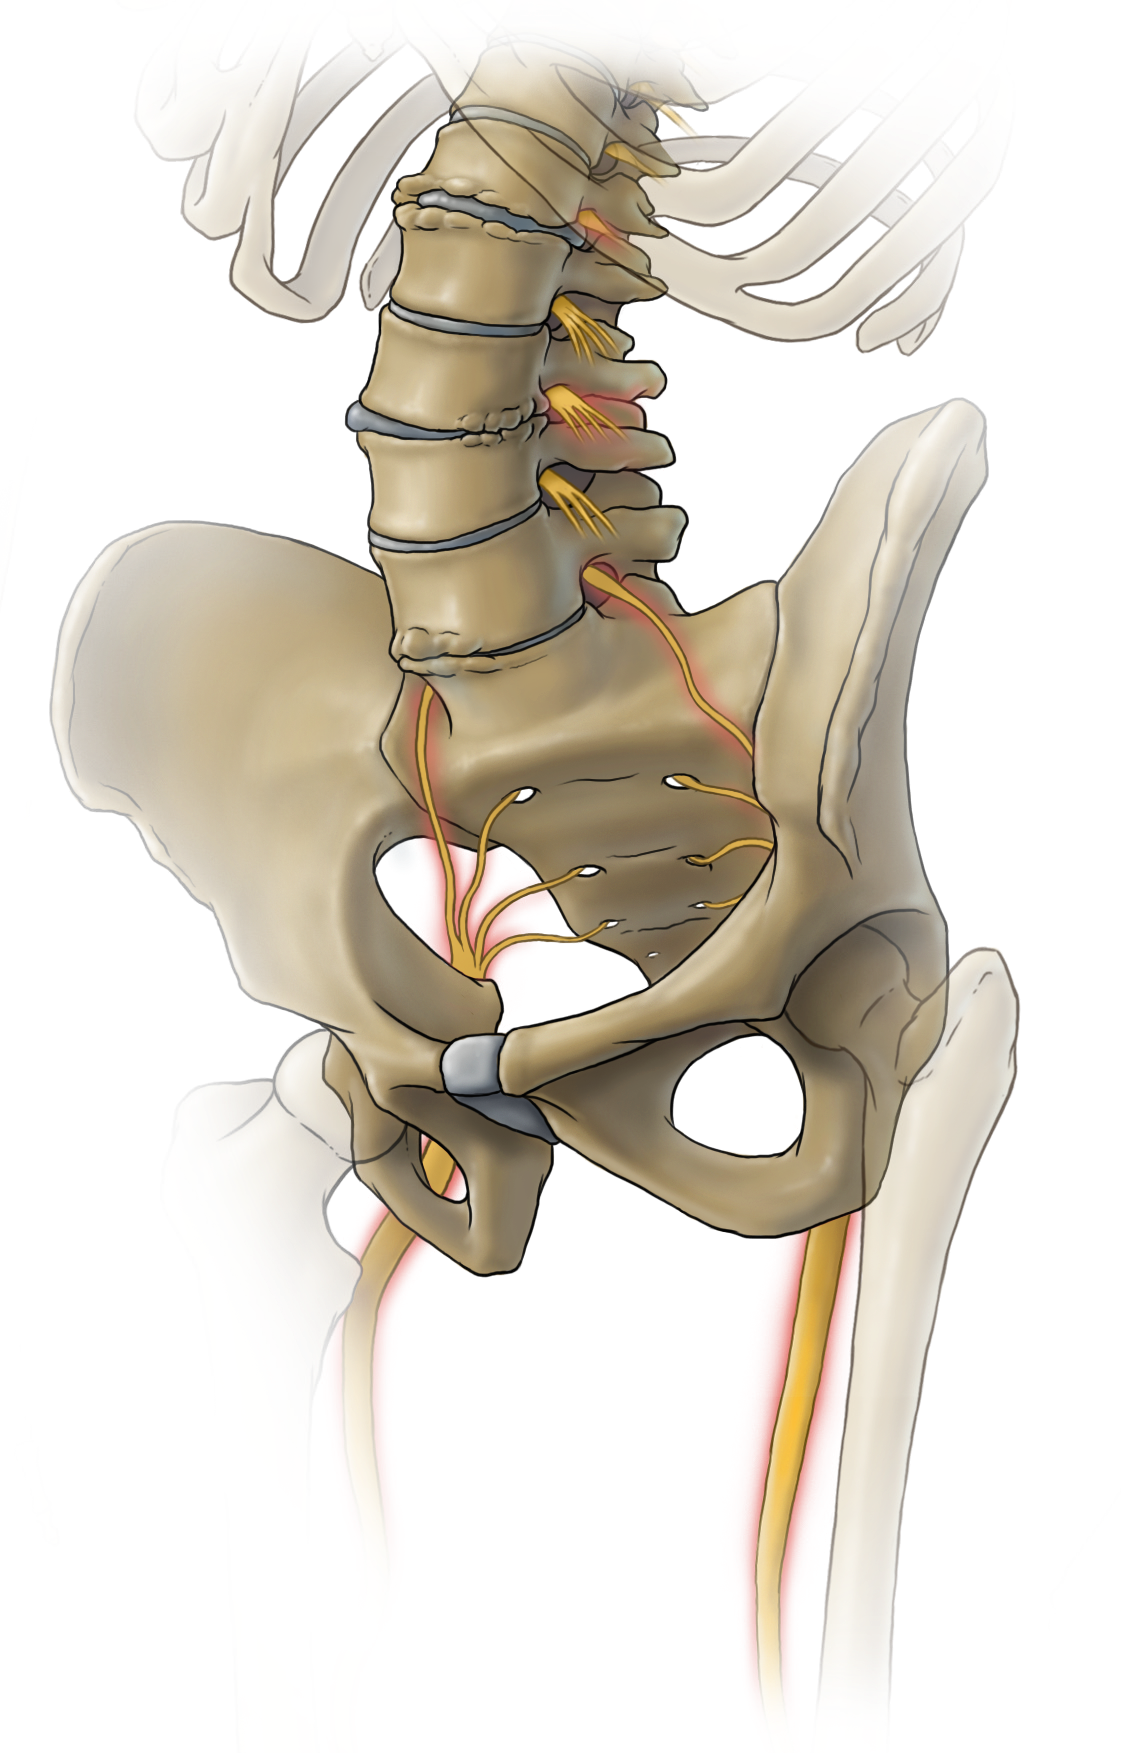
Original poster illustration: See the discs, bone spurs and nerve pathwaysEnlarge illustration

What to look for

  • L1–L2 and L3–L4. Look for the uneven bony outgrowths around the vertebral edges.
  • Discs. The grey spaces show the discs and the altered disc outline illustrated in the poster.
  • L5/S1. At the base of the lumbar spine, the poster depicts spurs and reduced disc space.
  • Nerves. Follow the yellow branches from the lower spine into the pelvis.
See the original labels ↗

Original poster artwork © Natalie Koscal, 2014; words and concept © Dr David Shahar. Illustrated findings, not patient scans. Read the clinical explanations below.

  • What may change. Discs and joints can develop structural changes, including disc-height loss and bone spurs. Repeated excessive loading can damage tissue, but a posture photograph cannot show whether this has happened.
  • Assess the finding and the person. Bone spurs, disc-height loss and bulging discs are meaningful parts of an assessment. Their importance is considered alongside symptoms, examination and function; some changes can be present without pain.
  • A useful first step. Bring loads closer when practical, use support and build strength gradually. Avoid trying to force everyone’s lower back into one identical curve.

Findings and symptoms in the original poster

  • Swayed back and tilted pelvis. The poster highlights the relationship between the lower-back curve and pelvic position when considering spinal loading.
  • Bone spurs at L1 and L2. Bony growths at the first and second lumbar vertebrae are specifically named, with back pain and sciatica listed in the poster. The location of any nerve involvement must match the symptoms.
  • Lateral bone spurs at L3 and L4. Bony growths at the sides of the third and fourth lumbar vertebrae are specifically named, again with back pain and sciatica listed.
  • Bulging disc. Part of a disc extends beyond its usual outline. The poster associates this with back pain and sciatica; symptoms depend in part on whether nearby nerve tissue is affected.
  • L5/S1 spurs with disc compression or erosion. At the junction of the fifth lumbar vertebra and the sacrum, the poster shows bone spurs and loss of disc space or disc tissue, using the words “compression/erosion”. Back pain and sciatica are the associated symptoms listed.
  • Scoliosis with spurs, bulging discs and sciatica. Scoliosis is a sideways spinal curve with rotation. The poster brings these findings together. Adult degenerative scoliosis and childhood idiopathic scoliosis have different clinical contexts.
  • Uneven hips and pelvis. Pelvic asymmetry is shown alongside hip pain, back pain and scoliosis. Assessment considers how the person stands and moves as well as any structural differences.
How to interpret these findings

The original shows a swayed back, tilted pelvis, spurs at L1–L2 and L3–L4, a bulging disc and disc-height loss/spurs at L5–S1. These are examples, not a predictable sequence or an inevitable result of posture. Sciatica means a pattern of nerve-related symptoms into the leg; a bone spur or a tight muscle does not automatically explain it.

Sources behind this explanation
When mechanics affect nerves ↗

05 / Hips, knees & legs

A change in one area can change the task elsewhere.

Your hips and knees help support and move your body. Pain, injury or fatigue can change how you stand and walk.

LOOK INSIDE

Muscles around the lower spine, hips and thighs

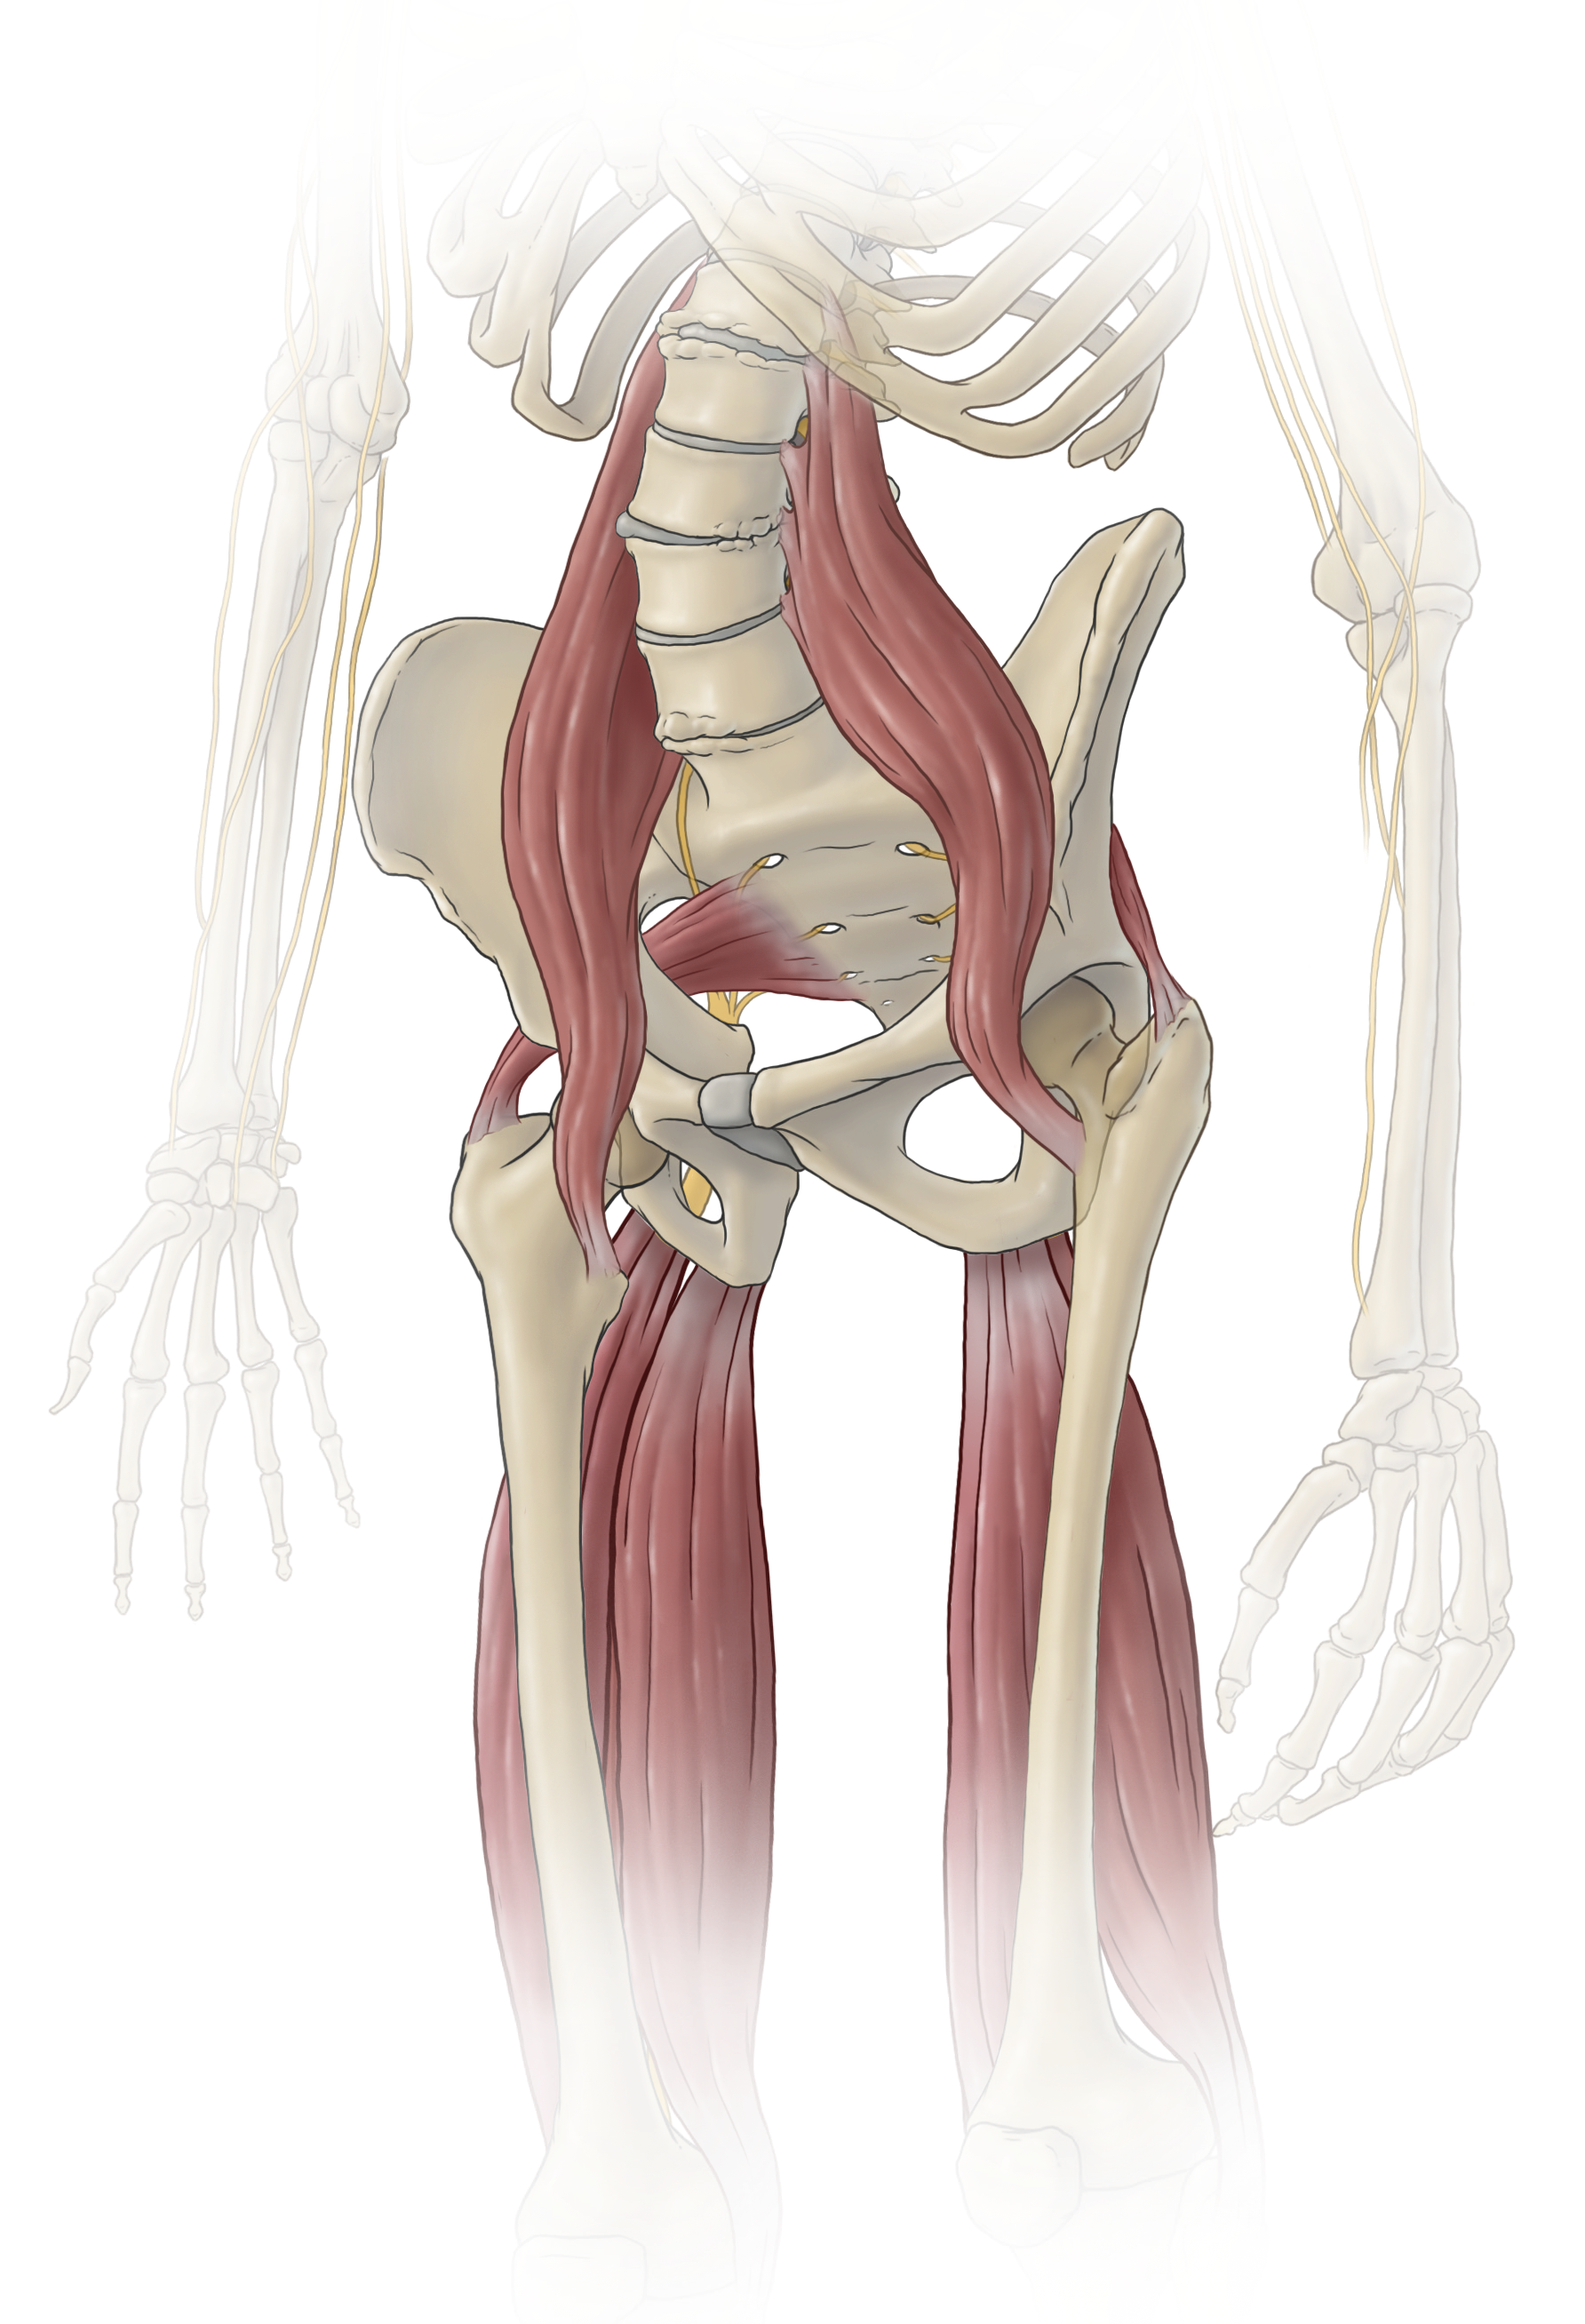
Original poster illustration: Muscles around the lower spine, hips and thighsEnlarge illustration

What to look for

  • Psoas. The long muscles run down beside the lumbar spine towards the hips.
  • Piriformis. The small muscle crosses from the sacrum towards the hip.
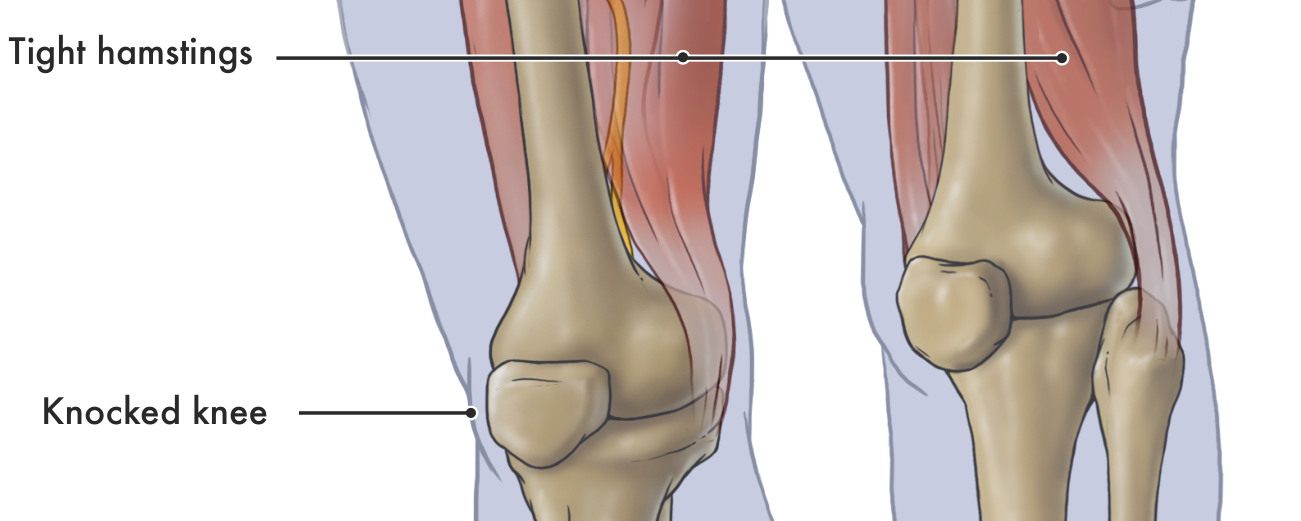
  • Thigh muscles and knees. The wider view below retains the original hamstring and knee-alignment labels.
See the original labels ↗
Original poster illustration: Thigh muscles and inward-angled kneesEnlarge illustration
Thigh muscles and inward-angled knees

Original poster artwork © Natalie Koscal, 2014; words and concept © Dr David Shahar. Illustrated findings, not patient scans. Read the clinical explanations below.

  • What may change. A person may shift weight or move differently to manage discomfort. Muscles around the hips and legs also contribute to movement and support.
  • Alignment and joint health. Hip and knee alignment influences how load passes through the legs. Joint pain, stiffness and arthritis can restrict walking, work and participation, so both structure and function matter.
  • A useful first step. Choose activity you can manage and increase it gradually. Seek advice for persistent joint pain, a changing limp, weakness or a new asymmetry.

Findings and symptoms in the original poster

  • Tight psoas. The psoas links the lumbar spine to the thigh and helps bend the hip. The poster pairs tightness with lower-back and hip pain.
  • Tight piriformis. The piriformis is a deep buttock muscle. The poster associates it with sciatica; assessment is needed to locate the source of leg nerve symptoms.
  • Tight hamstrings. These muscles run down the back of the thigh. The poster pairs tightness with lower-back pain and stiffness.
  • Irritation of sciatic nerve components. The poster lists weakness, pain, numbness and tingling through the lower limbs. These symptoms warrant attention to the nerves and their possible sites of irritation.
  • Knock-knee alignment, knee pain and arthritis. The knees angle inwards. The poster places this alignment alongside knee pain and arthritis, making the relationship between alignment, joint loading and joint health part of the assessment.
How to interpret these findings

The poster names the psoas, piriformis and hamstrings and associates tightness with back/hip pain or sciatica. It also links uneven hips to scoliosis and inward-angled knees to arthritis. These labels point to areas worth examining, but cannot determine a diagnosis. Osteoarthritis has several contributors, including age, previous injury and repeated joint loading.

Sources behind this explanation
Explore the exercise library ↗

06 / Feet & ankles

Your feet meet the ground.

They help support your weight and adapt as you walk. Their shape and the demands placed on them vary.

LOOK INSIDE

The foot bones, ankle and arch

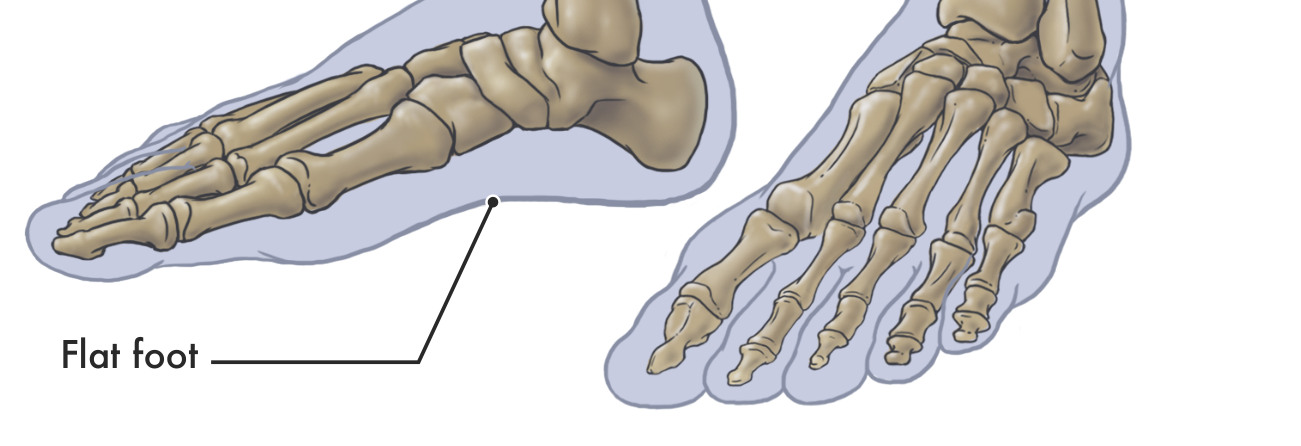
Original poster illustration: The foot bones, ankle and archEnlarge illustration

What to look for

  • Foot bones. See the bones that make up the heel, mid-foot and toes.
  • Arch. The original pointer identifies the flattened arch illustrated in the poster.

Original poster artwork © Natalie Koscal, 2015; words and concept © Dr David Shahar. Illustrated findings, not patient scans. Read the clinical explanations below.

  • What may change. Long periods on your feet or a sudden increase in activity can exceed your current capacity. Repetitive loading can cause a bone stress injury when damage outpaces repair.
  • Foot shape and symptoms. Flat feet may be comfortable or accompanied by foot and ankle pain, stiffness or arthritis. Assessment looks at symptoms, mobility and changes in shape, including new or one-sided flattening.
  • A useful first step. Use comfortable footwear suited to the activity, progress activity gradually and seek advice for persistent foot or ankle symptoms.

Findings and symptoms in the original poster

  • Flat foot, foot and ankle pain, stiffness and arthritis. A low or flattened arch is shown with these symptoms and joint changes in the original poster. The guide retains all of them. Some flat feet are comfortable; painful, newly flattened or changing feet deserve assessment.
How to interpret these findings

The original poster links flat feet with foot and ankle pain, stiffness and arthritis. Those conditions can coexist, but many people with flat feet have no symptoms. Treatment decisions depend on function and symptoms rather than arch appearance alone.

Sources behind this explanation
Explore comfortable standing ↗

02 / THE IDEA BEHIND THE POSTER

Load can build.
Overload can damage.

Your tissues are living structures. They can adapt to useful demands, but they also have limits.

Demand

What are you asking of your body?

The weight, reach, direction, repetition and time all matter. A brief movement and the same position held for hours are different exposures.

Capacity

What can it manage today?

Strength, conditioning, age, previous injury and tissue health affect tolerance. The same task can ask different things of different people.

Recovery

Is there room to recover?

Rest, varied activity and appropriate progression allow repair and adaptation. Repeated demands that outpace recovery can accumulate damage.

When load exceeds a tissue’s capacity to tolerate and recover, it can contribute to tissue damage, pain and reduced function. These do not always occur together or in a fixed order.

See how position changes demand ↗

Reduce harmful stress. Preserve useful loading.

Dr Shahar’s prevention principle is that reducing repeated, harmful mechanical stress should reduce the contribution that overload makes to degeneration. The aim is to keep the loading that supports healthy tissue while limiting demands that repeatedly exceed what it can tolerate and recover from.

In practice, that can mean changing an unnecessarily long reach, sharing a heavy load, using suitable support, varying sustained positions and progressively building strength.

What supports this explanation?

A German case-control study linked cumulative occupational lumbar loading with clinically verified disc herniation and symptomatic disc narrowing. This supports the relevance of accumulated physical demands to disc disease. It does not measure how much a particular posture correction slows degeneration.

A 12-month trial in adult women found that bone adaptation depended on the dose of a particular forearm-loading programme. This supports loading-related adaptation in that setting; it does not establish a spinal-posture treatment.

Repeated bending under compression produced disc injury in an experimental porcine tissue model. It demonstrates a possible mechanical injury mechanism, not a universal safe limit for people or proof that ordinary bending damages your discs.

03 / THREE DIFFERENT PARTS OF THE STORY

What changes. What hurts.
What you can do.

Structure

Damage can be silent.

Some tissue changes occur without pain. Imaging changes are also common in people without symptoms, so a scan alone does not tell the whole story.

Pain

Pain deserves attention.

Pain can occur without demonstrable structural damage. It is real, and is influenced by more than the appearance of a joint or spine.

Function

Daily life matters.

Reduced function may mean difficulty working, walking, sleeping or doing things you enjoy. Disability describes a loss or restriction of ability and participation.

Like dental care, Dr Shahar’s approach encourages everyday attention before pain becomes the only prompt. The analogy supports a habit of care; it does not prove that posture habits prevent every structural change.

When can a mechanical problem affect a nerve?

A disc herniation or bony narrowing can irritate or compress a nerve root. This may produce pain, numbness or weakness in the area it serves. Spinal cord compression is a different problem and can affect hand function, walking and balance. A rounded posture or scan finding alone cannot establish either diagnosis.

New or worsening neurological symptoms need assessment. Seek urgent medical help for new bladder or bowel changes with back/leg symptoms, numbness around the groin, or rapidly worsening weakness. Read the nerve guide and urgent warning signs.

Read the evidence on symptoms and tissue findings

04 / ONE POINT OF AWARENESS

The Manubrium Lift®

A simple cue within
a wider routine of care.

The manubrium is the upper part of your breastbone, between the collarbones. Dr Shahar uses it as one point of attention for a gentle, more upright organisation of the head and trunk.

Explore the cue and its purpose ↗

THE TWO STEPS IN DR SHAHAR’S POSTER

  1. Find the point.

    Locate the upper breastbone just below the base of your neck, between your collarbones.

  2. Gently lift upwards.

    Use that point as your focus. Notice how the position of your head and trunk responds. Keep breathing comfortably and avoid forcing your shoulders or lower back.

This is an introduction to the poster’s cue. The complete demonstration lesson is still being prepared. Ease off or stop if uncomfortable and seek individual guidance if needed.

What benefits are intended, and what remains unproven?

Dr Shahar’s clinical aims include a more comfortable upright posture, less perceived tension and an easy reminder for daily care. The poster also describes a different head, chest and lower-back position, a taller appearance and greater confidence.

Individual responses vary. The poster’s claims of reduced internal joint pressure, decompressed organs, increased lung capacity, correction of a fixed spinal curve, improved ageing or guaranteed pain relief have not been established here in trials of this technique. A cue cannot be assumed to reverse structural changes. Read how clinical proposals and research fit together.

05 / MAKE IT USEFUL TODAY

Choose a moment.
Make one change.

Start with something you already do. Use support, vary the demand and build capacity over time.

Before I start desk work…

I will bring my keyboard and mouse within comfortable reach and let the desk support my forearms.

  • Set the screen where I can read without leaning towards it.
  • Build opportunities to stand, walk or change tasks.
  • Once learned, use the Manubrium Lift as a gentle reminder alongside these changes.
Open the desk checklist ↗

Before a longer phone task…

I will find a comfortable viewing position and support my arms where possible.

  • Adjust text size or viewing distance rather than repeatedly leaning closer.
  • Change position and pause the task when useful.
  • Let any posture cue remain gentle and easy to move from.
Explore sitting and reading support ↗

Before I pick something up…

I will consider its weight, my route and whether I can bring it closer, split the load or use help.

  • A shorter reach usually reduces the external turning demand.
  • Use assistance or equipment when the task exceeds what I can manage.
  • Build capacity progressively rather than relying on posture alone.
Try the load-sharing example ↗

These choices are not saved or used to score your posture. For personal symptoms or health conditions, seek individual advice. Read the health and safety guidance.

About Reform or Deform™ and this edition

Reform or Deform™ is Dr David Shahar’s educational framework for considering how repeated demands and everyday care relate to the body over time. “Reform” describes working towards better capacity, movement and function. It does not promise that every structural change can be reversed. “Deform” draws attention to adverse structural change, not a judgement about a person’s appearance or worth.

Adapted from Dr Shahar’s original posters: words and concept © Dr David Shahar, 2014–2015; anatomical illustrations © Natalie Koscal, 2014–2015. The anatomical drawings and labelled excerpts are extracted from the posters supplied by Dr Shahar. The surface-view woman was created for this web edition using the established Dr Posture exercise character.

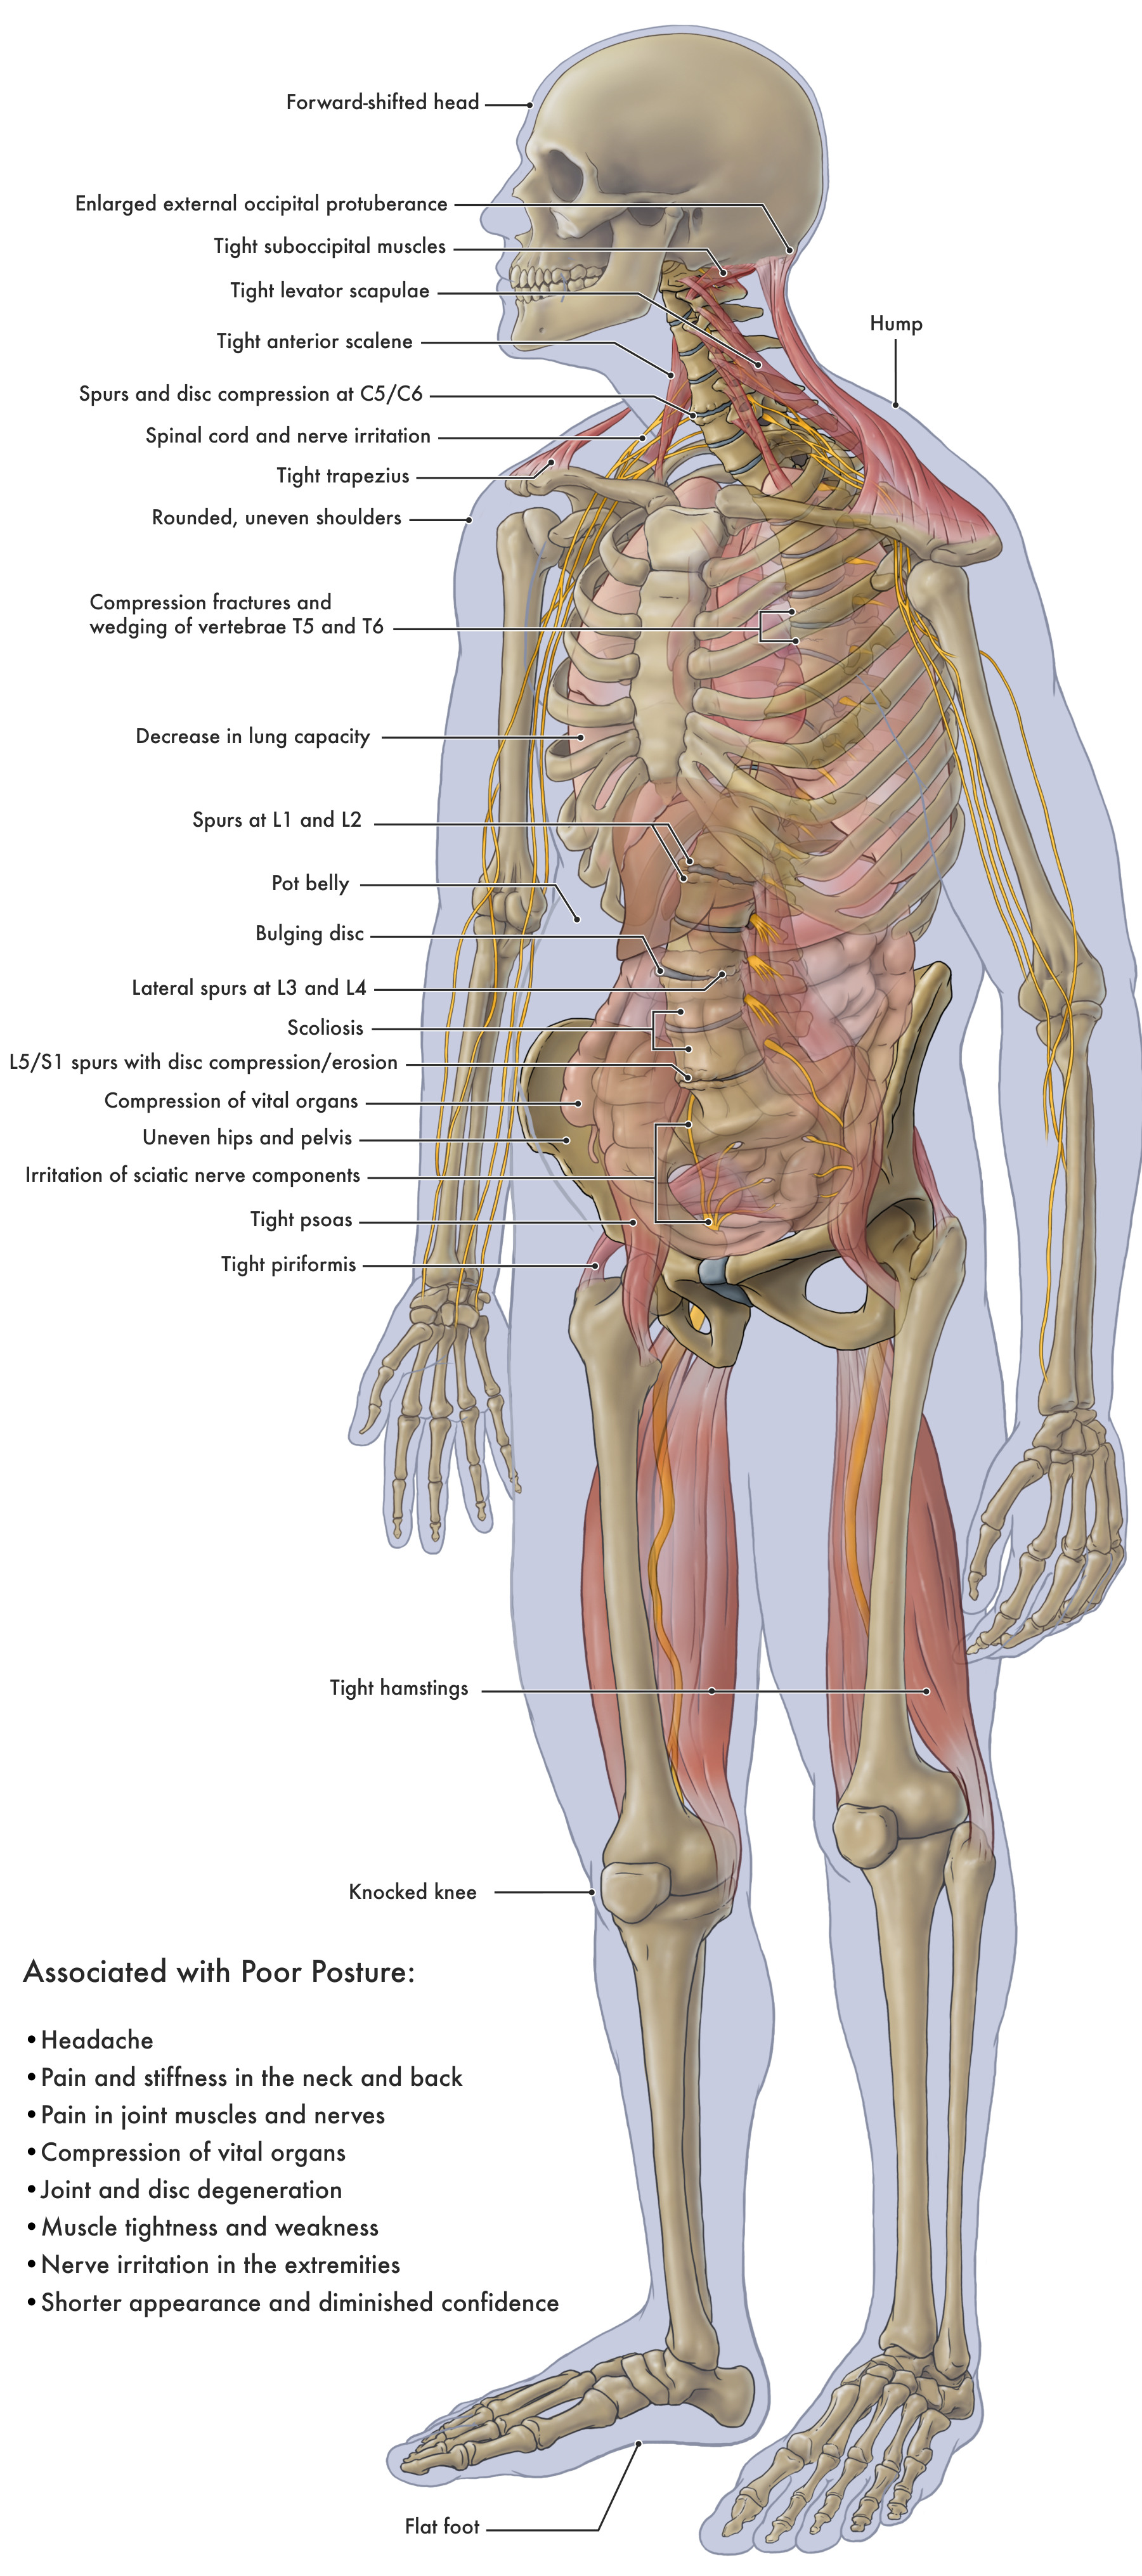
Every finding and associated symptom from the clinical side of the original poster is retained in the body-region lists. Dr Shahar’s clinical observations are identified separately from research findings, and claims about correction are distinguished from guaranteed outcomes. Source links accompany each topic. The guide is general education; it cannot assess a person’s tissues or diagnose disease from posture.

Updated and sources checked 3 November 2026 · Author-review edition

ANATOMY / CLOSE-UP

Anatomical illustration

100%

Magnify the drawing, then scroll or swipe to explore it. Press Escape or Close to return.

Enlarged original anatomical illustration